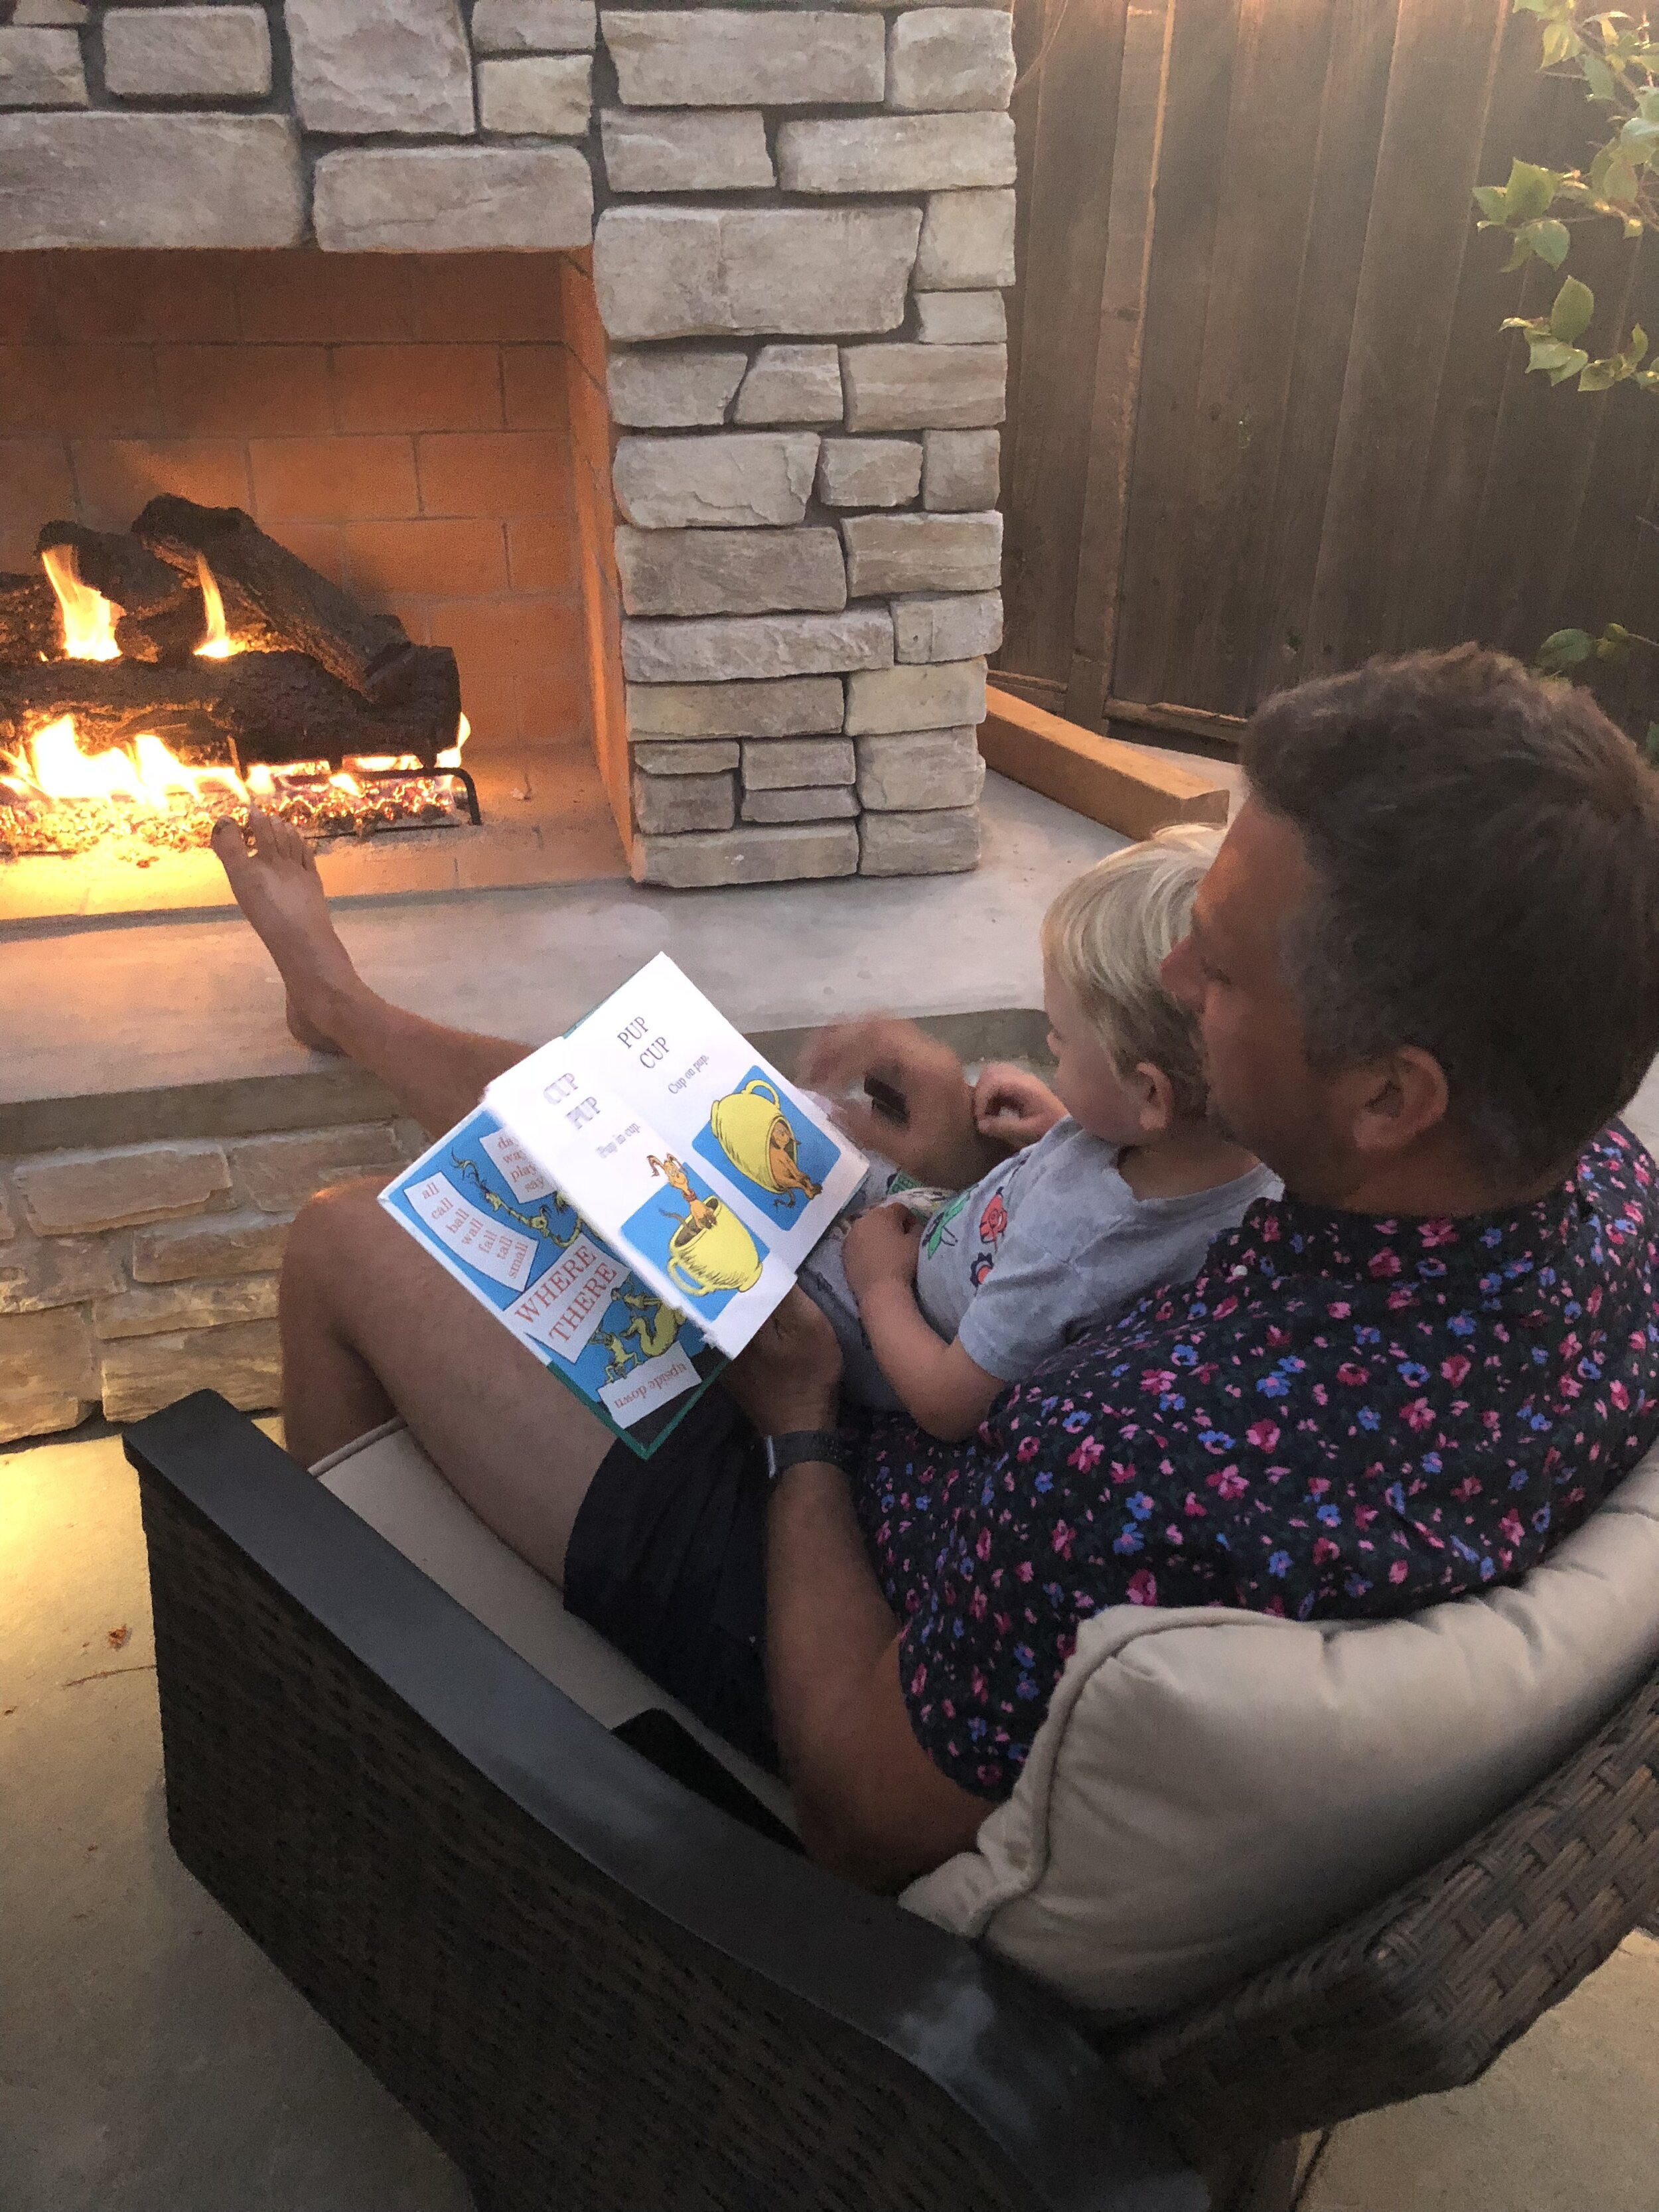
That’s me
I just finished pouring my blood, sweat and tears (quite literally… except not so many tears) into this outdoor fireplace/grill structure. I do think the extra blood helped create a stronger bond in the mortar I used. There’s Pro Tip #1 for ya, free of charge.
Since I would not have been able to do this without the help of frequent Googling and YouTube-viewing to read/watch other people’s trials and tribulations on projects like this, I thought I’d share my personal experience putting this thing together in the event it helps YOU.
Suffice to say, it’s completely changed our backyard and I now spend a lot of time out there at all hours of the day. Morning coffee, lunch, and of course dinner and even later. 10/10 do recommend.
Planning/Budgeting
Know that I had ZERO masonry experience before jumping into this (outside of drilling a hole in stucco once. Does that count?). So I did a ton of pre-work watching YouTube mostly on how to mix mortar (more art than science!) and how to lay concrete block so it’s even and aligned. There are tons of great tutorials out there if you just search around.

My plyobox and random 2x4s served as a visual to conceptualize the eventual structure. ¯\_(ツ)_/¯
I had no idea how much any of this would cost… but i did know that going the DIY route would save me some serious chedda chedda here in the Bay Area, given typical contractor prices. My final tally on this was $7,916.29 over the 5 months it took me to finish this. That’s mostly just all the material, down to the individual screws and washers. I did pay a plumber $2,800 to come out and run a new gas line under the house out to this thing. I didn’t want to mess with gas and blow up the house. No way. But I did save a few bucks on that digging the trench myself for that. :-)
I would guess that if I hired out the entire project, it would have been at least $25k, and that’s a conservative estimate.
The other professional I worked with is a guy named Dan Heston out in Arizona who runs this AWESOME company called Backyard Flare. As a masonry novice, there’s no way I would have been able to do this without him. **Highly recommend reaching out to him if you’re trying to do this**. I worked with him on dimensions and concept early on and he ultimately provided me what was essentially the same kind of instructions I had playing with Lego as a kid. He was also more than willing to answer all of my stupid questions I had along the way, often responding within the hour AS I was working on the project. Super clutch.
Let’s get building
384 YouTube videos later, I figured I was as ready as I’d ever be to get going.
I first bought a quick load of 8x8x16 concrete blocks from Home Depot (they were cheapest I could find anywhere at $1.97/ea). I don’t own a pickup truck, so my Mazda CX-5 became my workhorse through this all. I did a dry layout of the blocks, then staked out and ran string where I wanted the blocks to follow, aligning them to that just for fit. And you’ll notice I already had a 4” thick concrete patio to build on, so that helped save some time/effort.
Like anything, no matter how many YouTube videos I watched or instructional blogs I read, you really don’t develop a rhythm or sense of how this should feel or go until you do it for a while.


I started out using Sakrete’s Masonry Type S mix, assuming it was as good as anything. And that’s mostly true for the block work. I ended up using a different mix toward the end that I felt was more workable and seemed like it set up quicker after laying stone/block. I honestly have no idea if that’s true or not, but I ended up preferring Greencore Type S mortar personally.
I started out mixing a full 60-lb bag of mortar in a wheelbarrow, mostly because that was how I made the right ratio of mortar-to-water, but quickly realized that I would end up with a bunch of unusable mortar due to how slowly i was working scooping out the mix with my 12” trowel. So from then on out, I just developed a sense for when the mortar was workable but stiff enough to use and made smaller batches that didn’t dry out on me. Some say it should feel like oatmeal, others say peanut butter. I guess I agree with either of those descriptions. Something a little firmer than toothpaste where you could grab a handful of it and it would maintain its shape when you let go.
I put down a line of mortar bed about 2” thick, knowing that I’d be packing the block down onto it with a rubber mallet to get 1/2” or 5/8” joint. I tried to maintain that general sizing throughout the entire build. I’d say I did OK.
The hardest part for me was getting the mortar to stick on the vertical surfaces of the block ends for when you press it up against the previous block. To this day I don’t know if it was because my block was too dry, too wet, too dirty, or my mortar wasn’t the right consistency or I just never developed the right troweling technique to get it to stick on… but it was hit or miss each time. I ended up doing some tuck-point troweling to fill in the joints on many blocks after I’d put them in place.
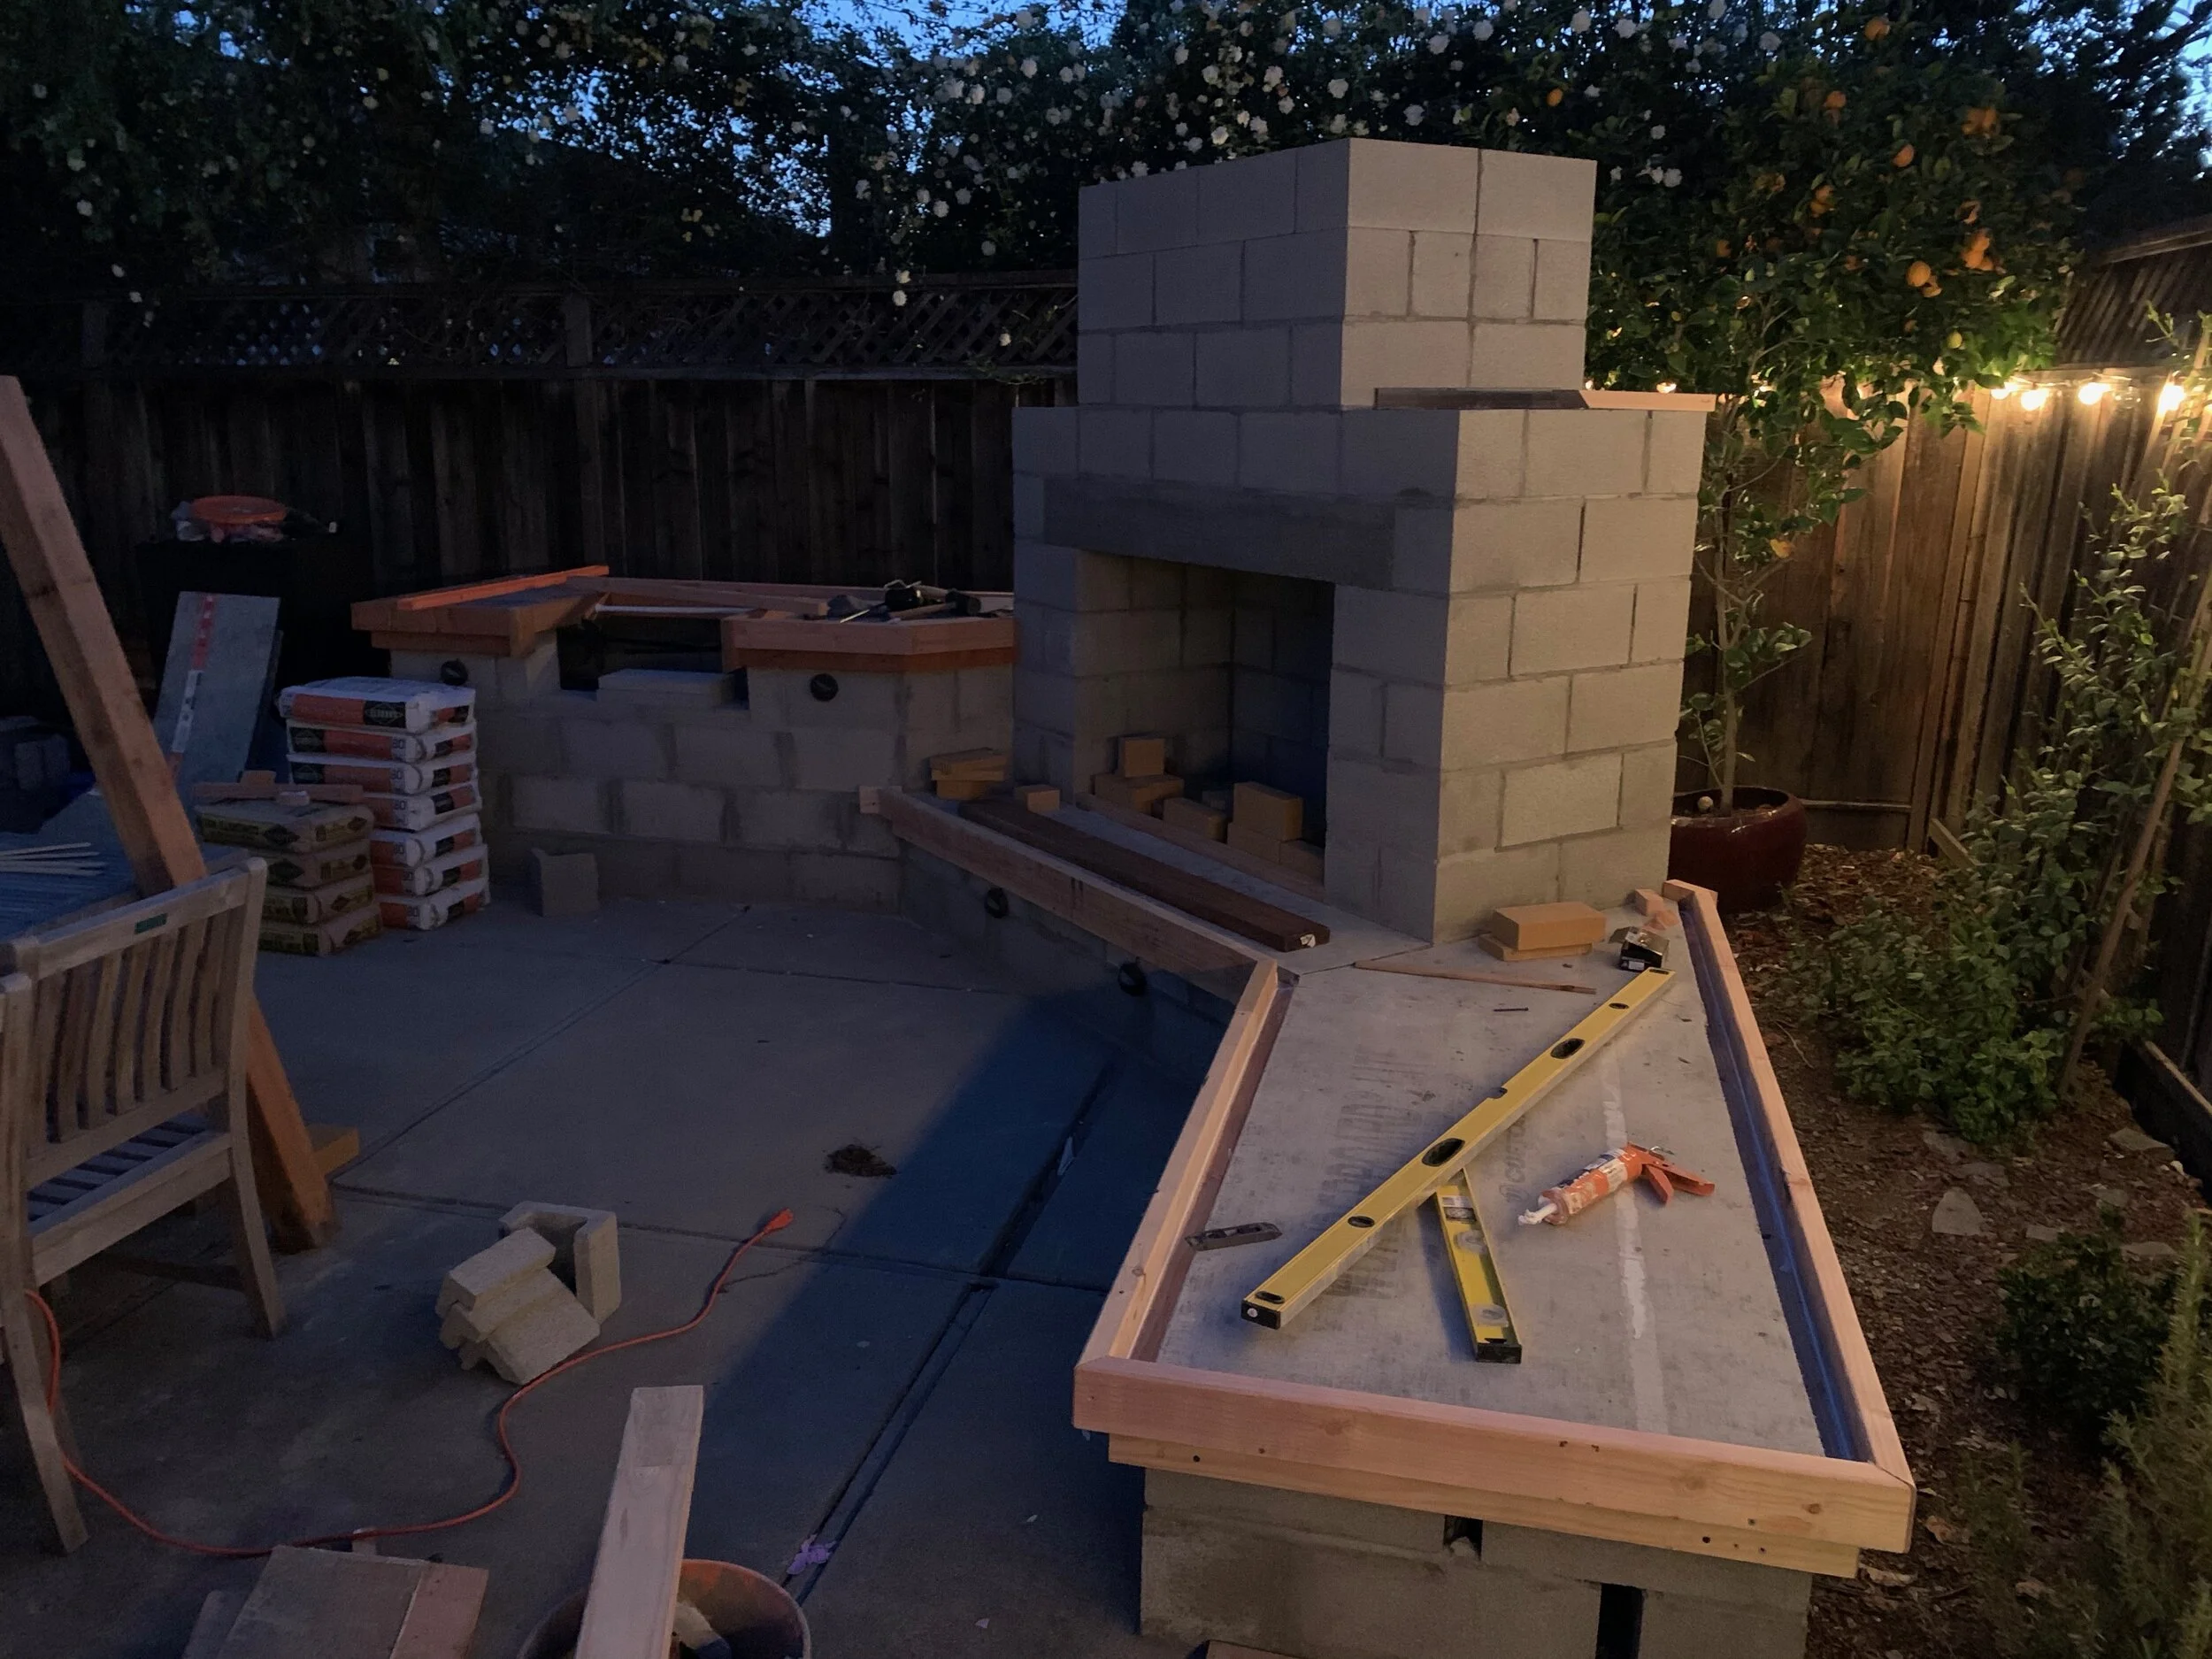
Taking shape
My backyard patio was slightly sloped — as all patios should be — to encourage proper drainage away from the house. And since I was building on that slope, I had to compensate by adding a taller mortar bed in the back than the front to create a more level structure. I used a 4’ level to ensure this was (mostly) maintained throughout the whole build. If I didn’t get it *exactly* right on one layer, I tried to compensate on the next layer. In my experience, I was continually doing this to make sure the final structure didn’t appear to lean one way or the other. Harbor Freight sells gigantic levels at VERY cheap prices btw.

Developing the footprint and on layer 2.
At this stage I also drilled 2” deep holes into the concrete patio at bottom of several of the block voids to hold the rebar pieces in place that travel up to the top. Those voids would be filled with concrete after I was done. I didn’t want to add concrete, then do a layer, and add concrete. Old concrete doesn’t bond to new concrete without some type of adhesive/additive, and even then it might be sort of a weak point. I felt that one continuous pour would give me better structural integrity. Again, I am NOT a structural engineer so I don’t know if this is true… but seems like it would be!
I’ve got gas
I always wanted this to be a gas-powered fireplace/grill. The advantages to me are clear: no messing with empty propane tanks halfway through a cook; no dealing with starting a fire and having to commit to that burn for a couple hours. With gas, it’s on or it’s off. No FUSS.
Of course, it’s not CHEAP to do this. I had a few plumbers come out to bid the project. There actually was an old gas line stub-out coming from the house and I think it used to power a grill from the previous homeowner. But given it was already T’d off an existing line that powered a water heater, furnace, and indoor fireplace, it was best to tap off at the meter and run a new 3/4” line directly to the this structure. Running too many appliances off a single gas line can mean, for instance, a pilot light goes out on the water heater when you turn the grill on outside. Not good.
The plumber I chose came in at $2,800, which I gladly paid. It’s not smart nor safe for a DIY’er like me to be messing with gas lines. I don’t feel like I need to explain that any further.
My plumber, Daniel, was great — I told him all about the project, and he advised me when I should stop building so it was in a state that would be easiest for him and his crew to drill holes and run pipe through everything. I texted him this rough sketch of where I wanted the key valve and stub-out, which all avoided the to-be-filled-with-concrete-and-rebar voids. The final job mostly looked like this, except the actual T for the key valve ended up closer to the face of that block, not so far behind it. But more or less that’s how it ended up, per image.
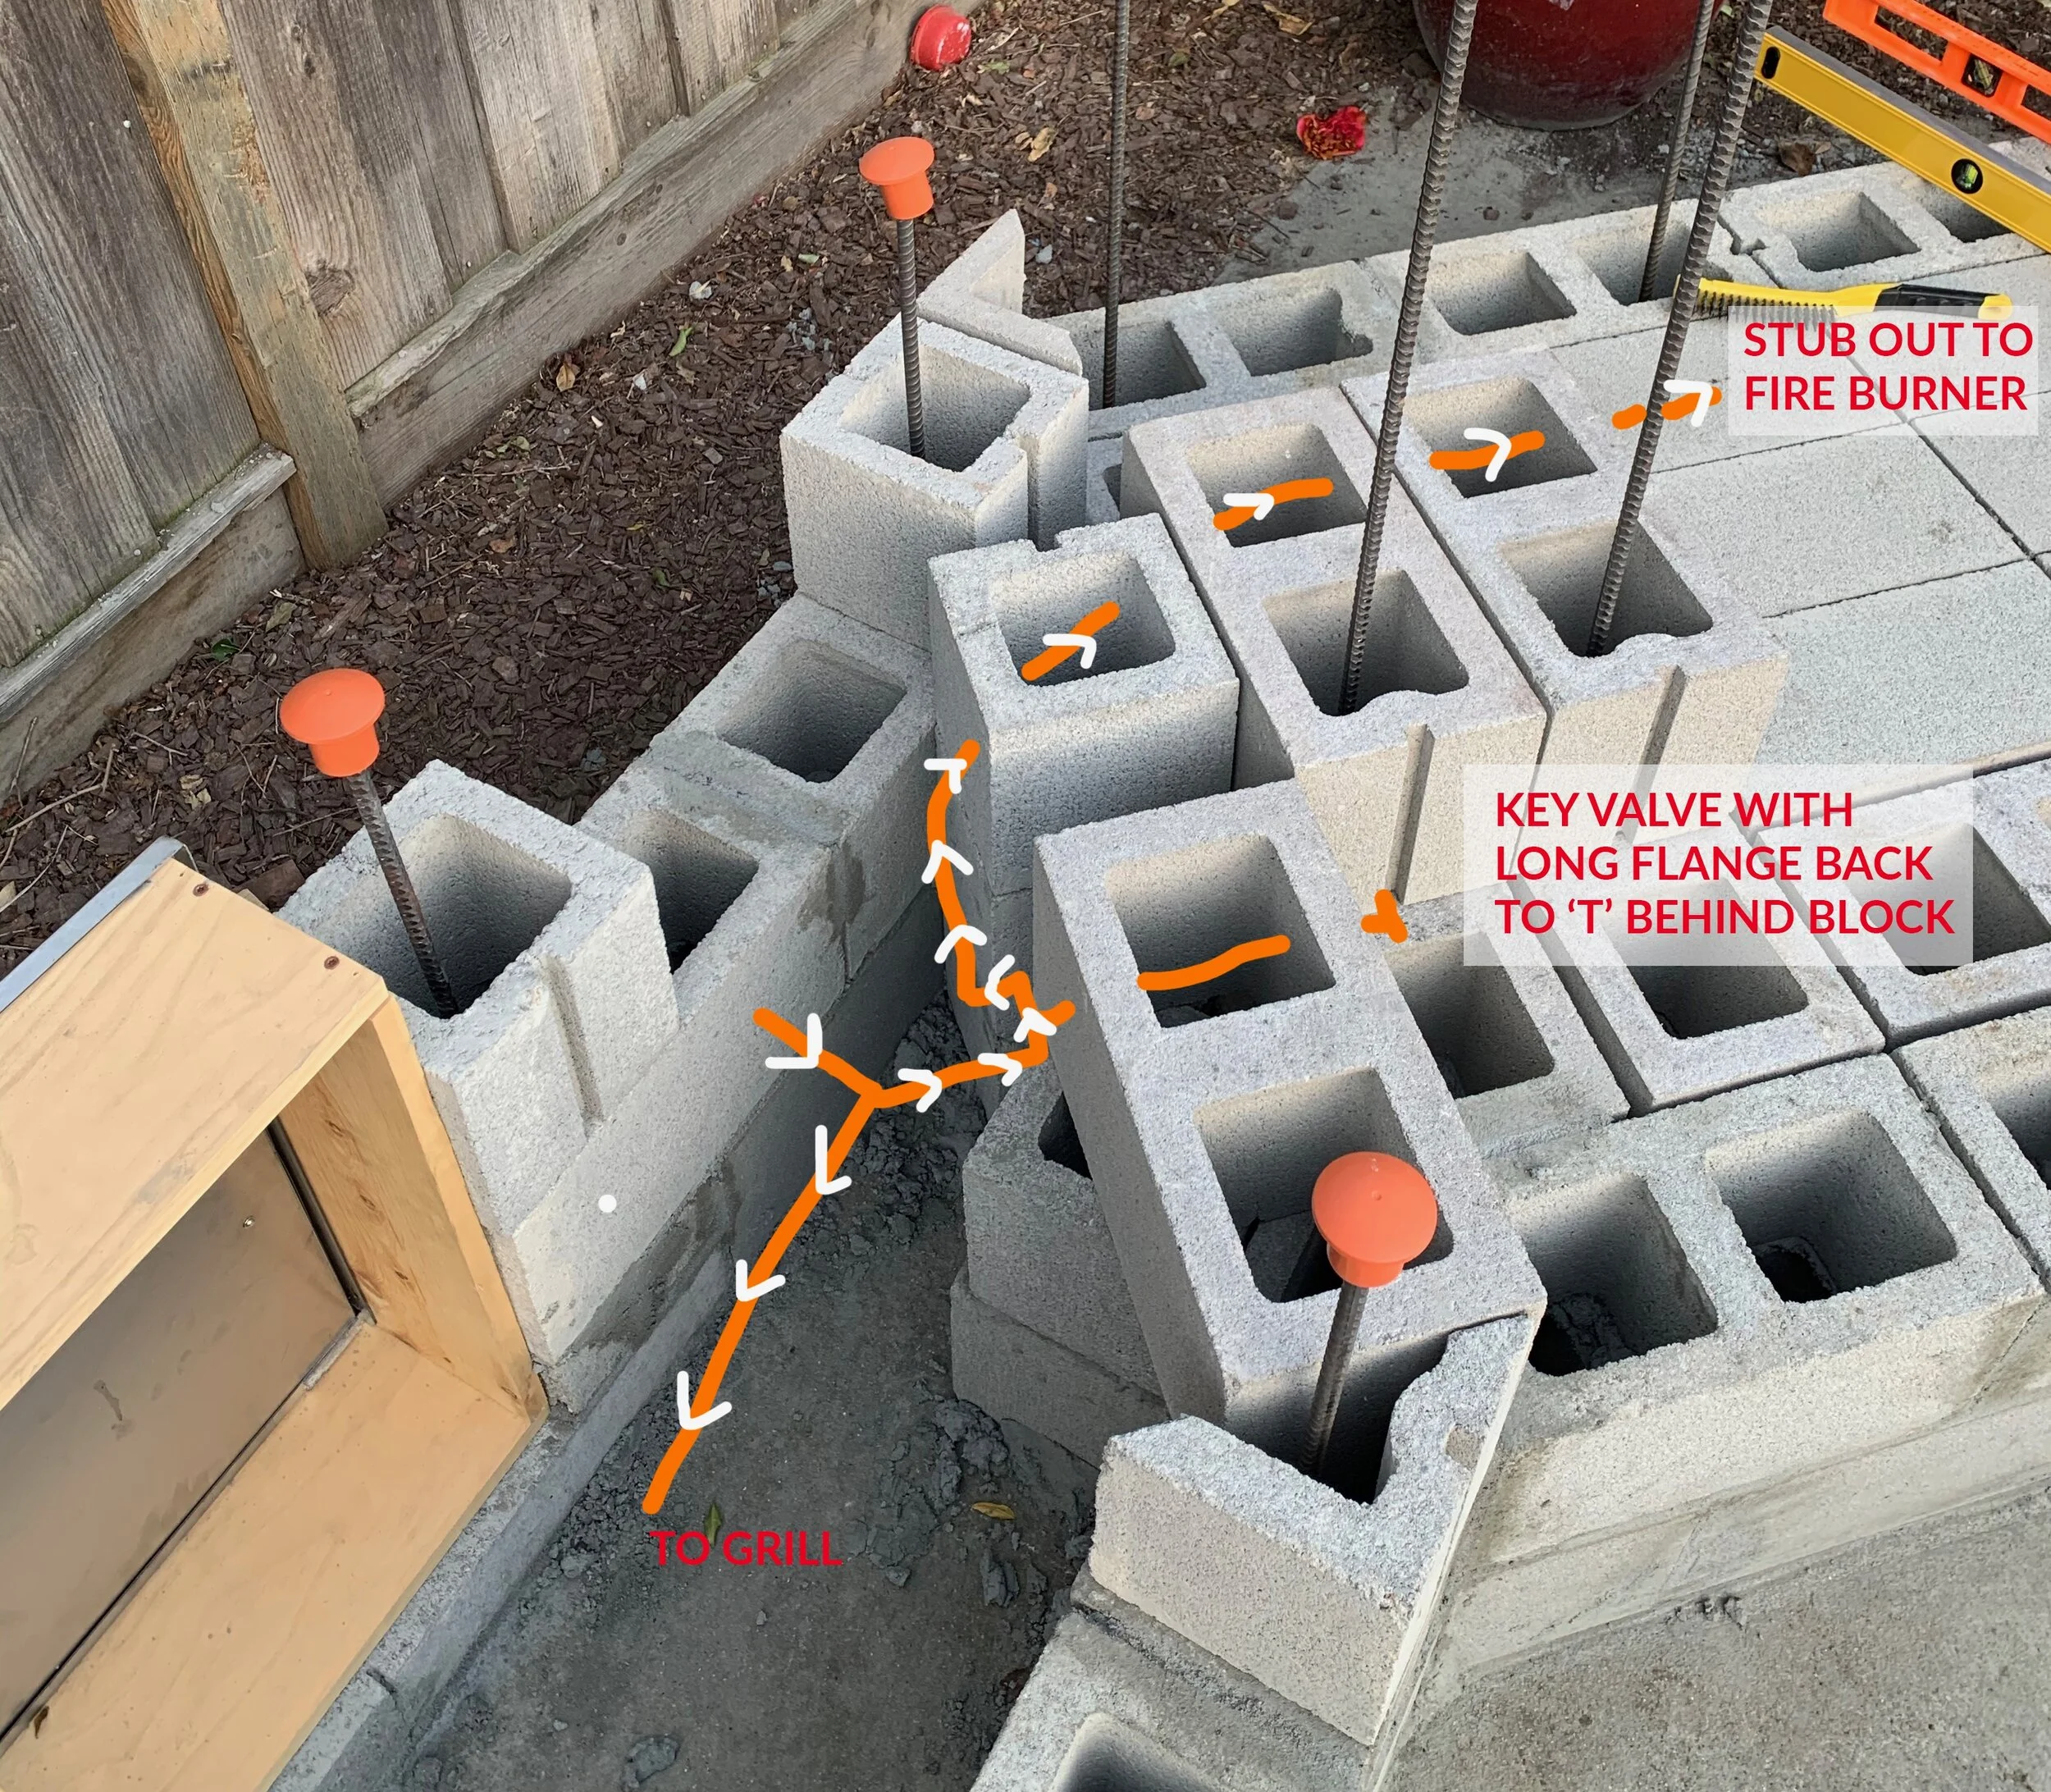

The other ‘fun’ part of this was I dug the trench myself. In our area, code dictates at least an 18” deep trench for gas lines. I did 20” just to be on the safer side. Why not? The plumber had a guy come cut the concrete patio where the gas line would run over to a dirt patch and then over to the structure.
I know my wife just LOVED the big-ass-dirt-pile look, which we enjoyed for about a week and a half until I was able to back-fill. Oh well. I saved some money and got a great shoulder/back/bicep workout. When everything was all good and passed pressure test with no leaks, it was time to back-fill. DIRT PILE GONE.
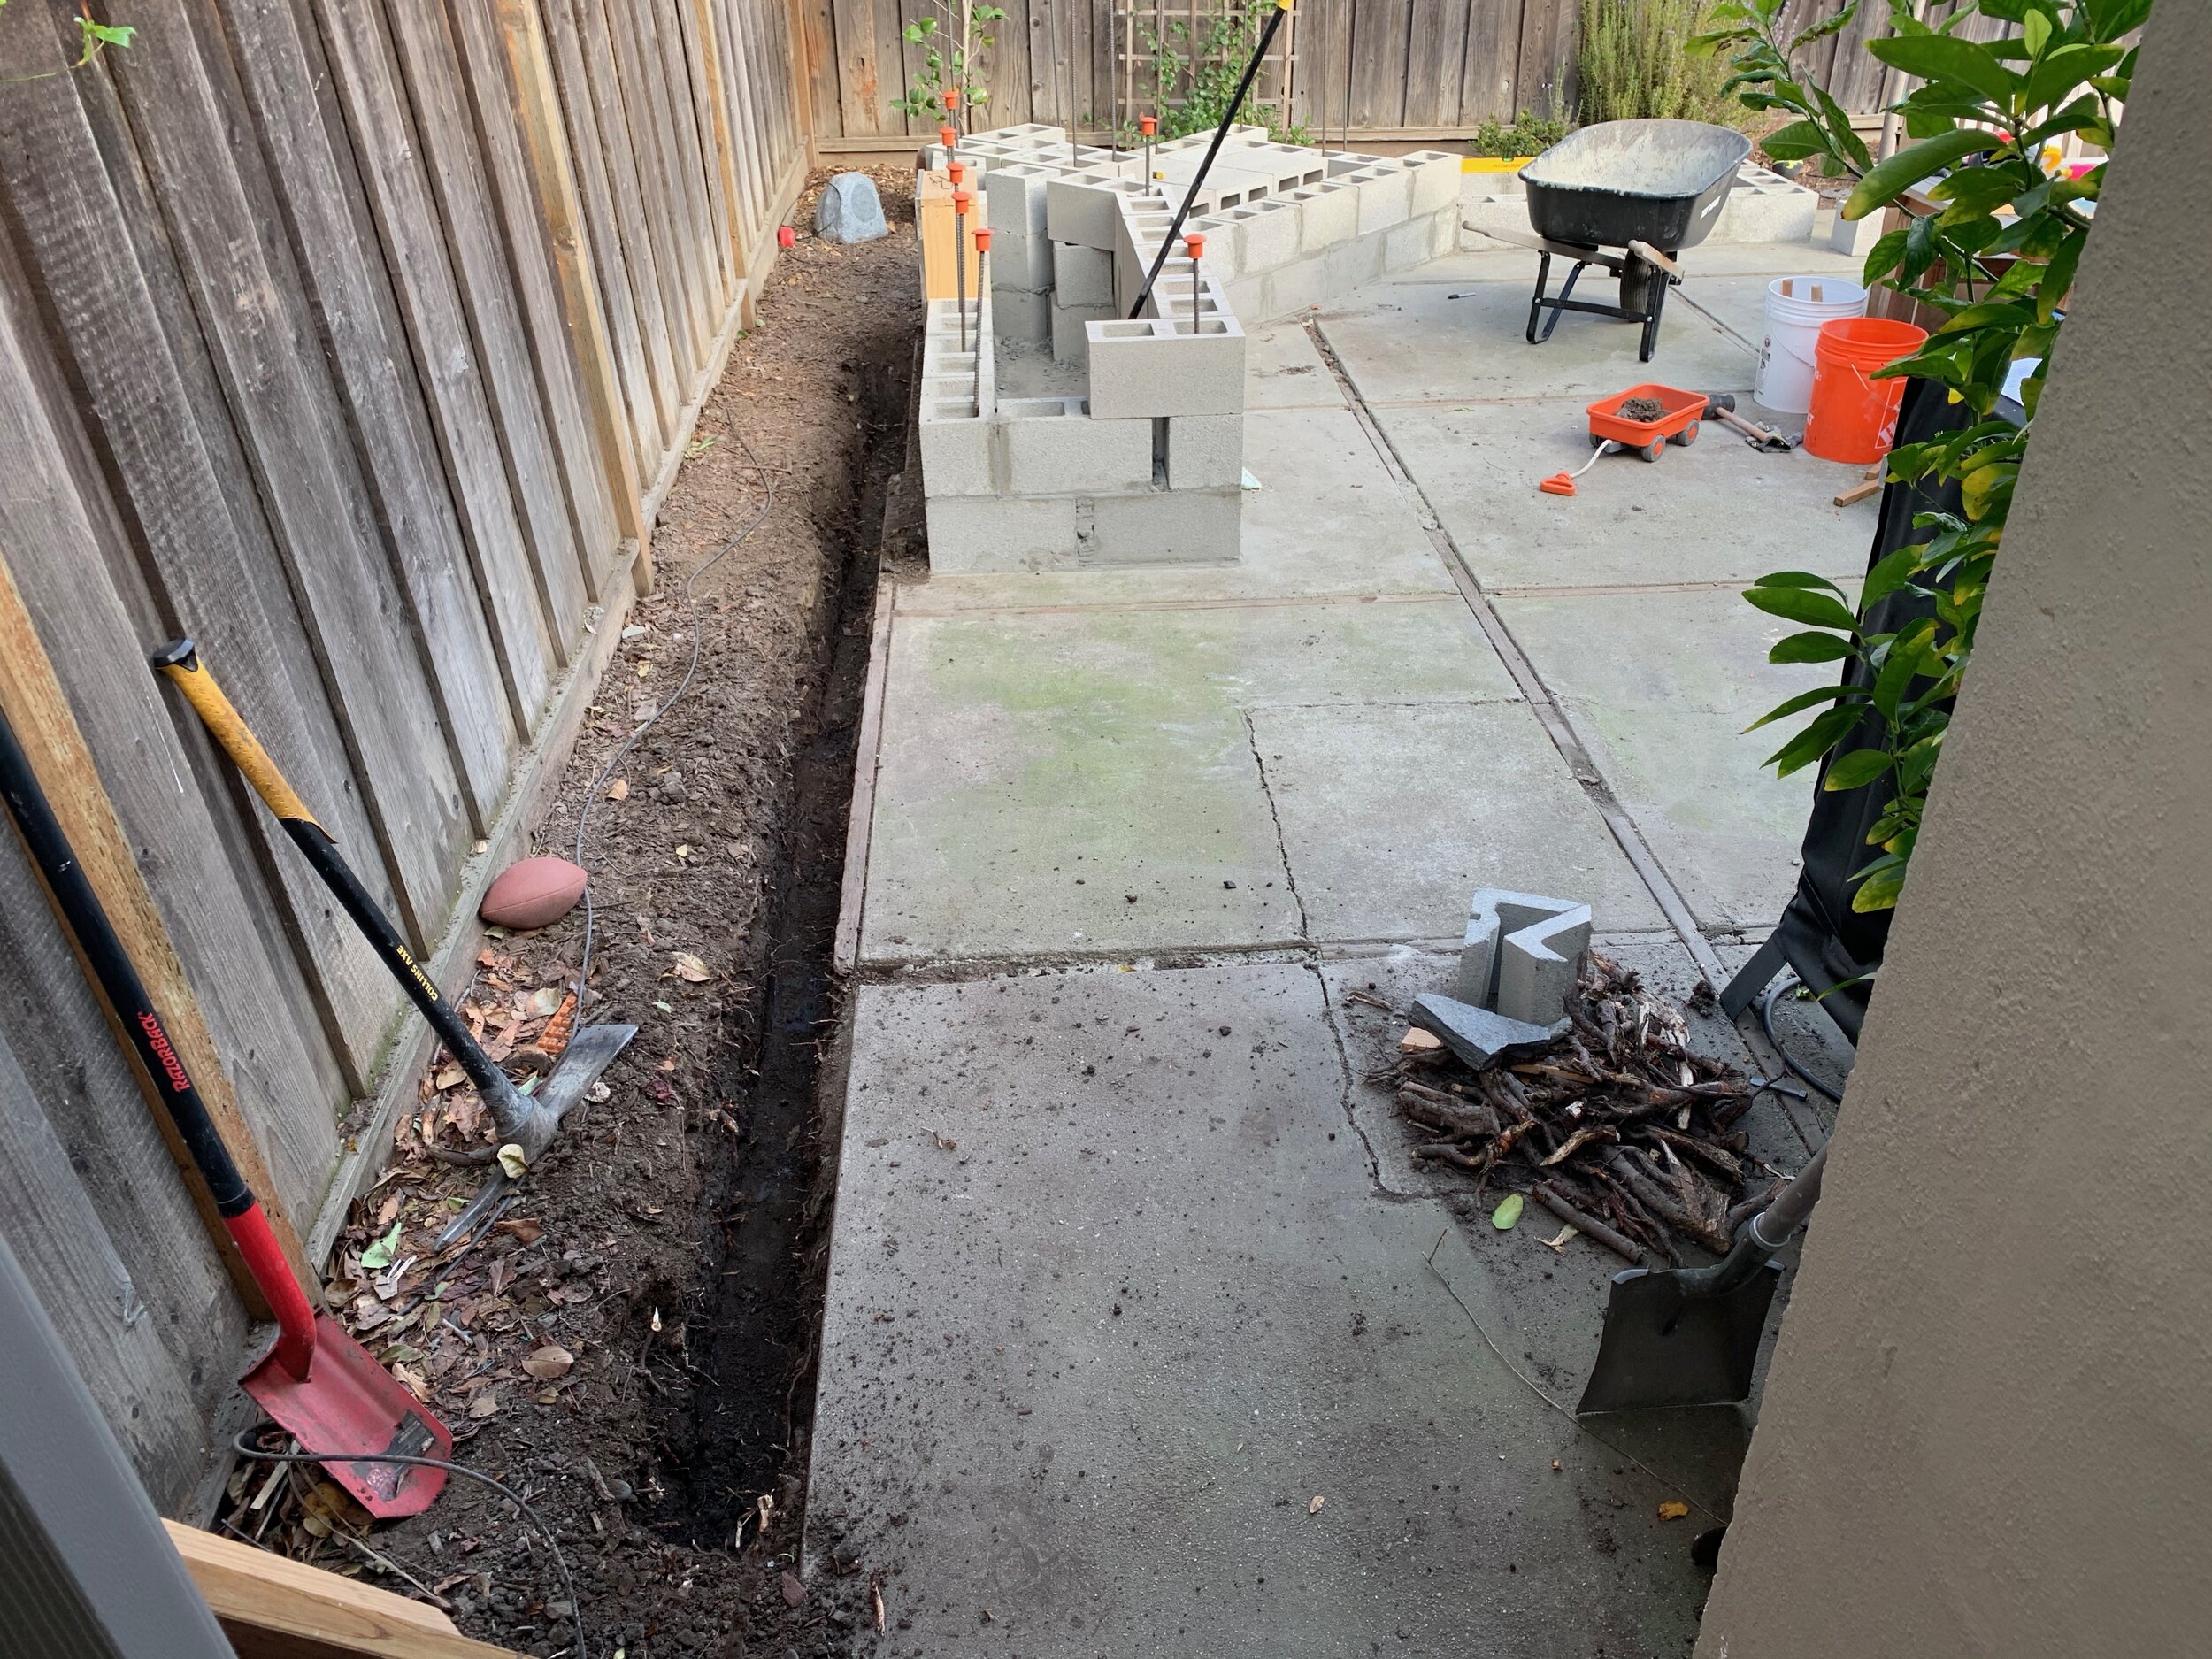


To back-fill the concrete that was cut out for the trench, I watched one video in particular on how to dowel the existing sides inside the trench with rebar so the new concrete didn’t separate from the old as it moves over the years. It was a little tricky since I had to go in at a downward angle (trench was only about ~6” wide, so my hammer drill wasn’t going to go in straight) and then pound in the rebar to the little hole, and hammer it down so it would sit under the surface.
OK, now with the gas infrastructure all done… time to get back to the grown-up Lego project…
Adult Lego-ing
Concrete block work truly feels like a big ass Lego project. Except these are 25-lb Legos. I wore a back-brace I had bought for weightlifting years ago. Really came in handy and I credit it with keeping my body in good shape throughout the build… especially on the lower layers when there was a lot of bending down. #liftwiththelegs
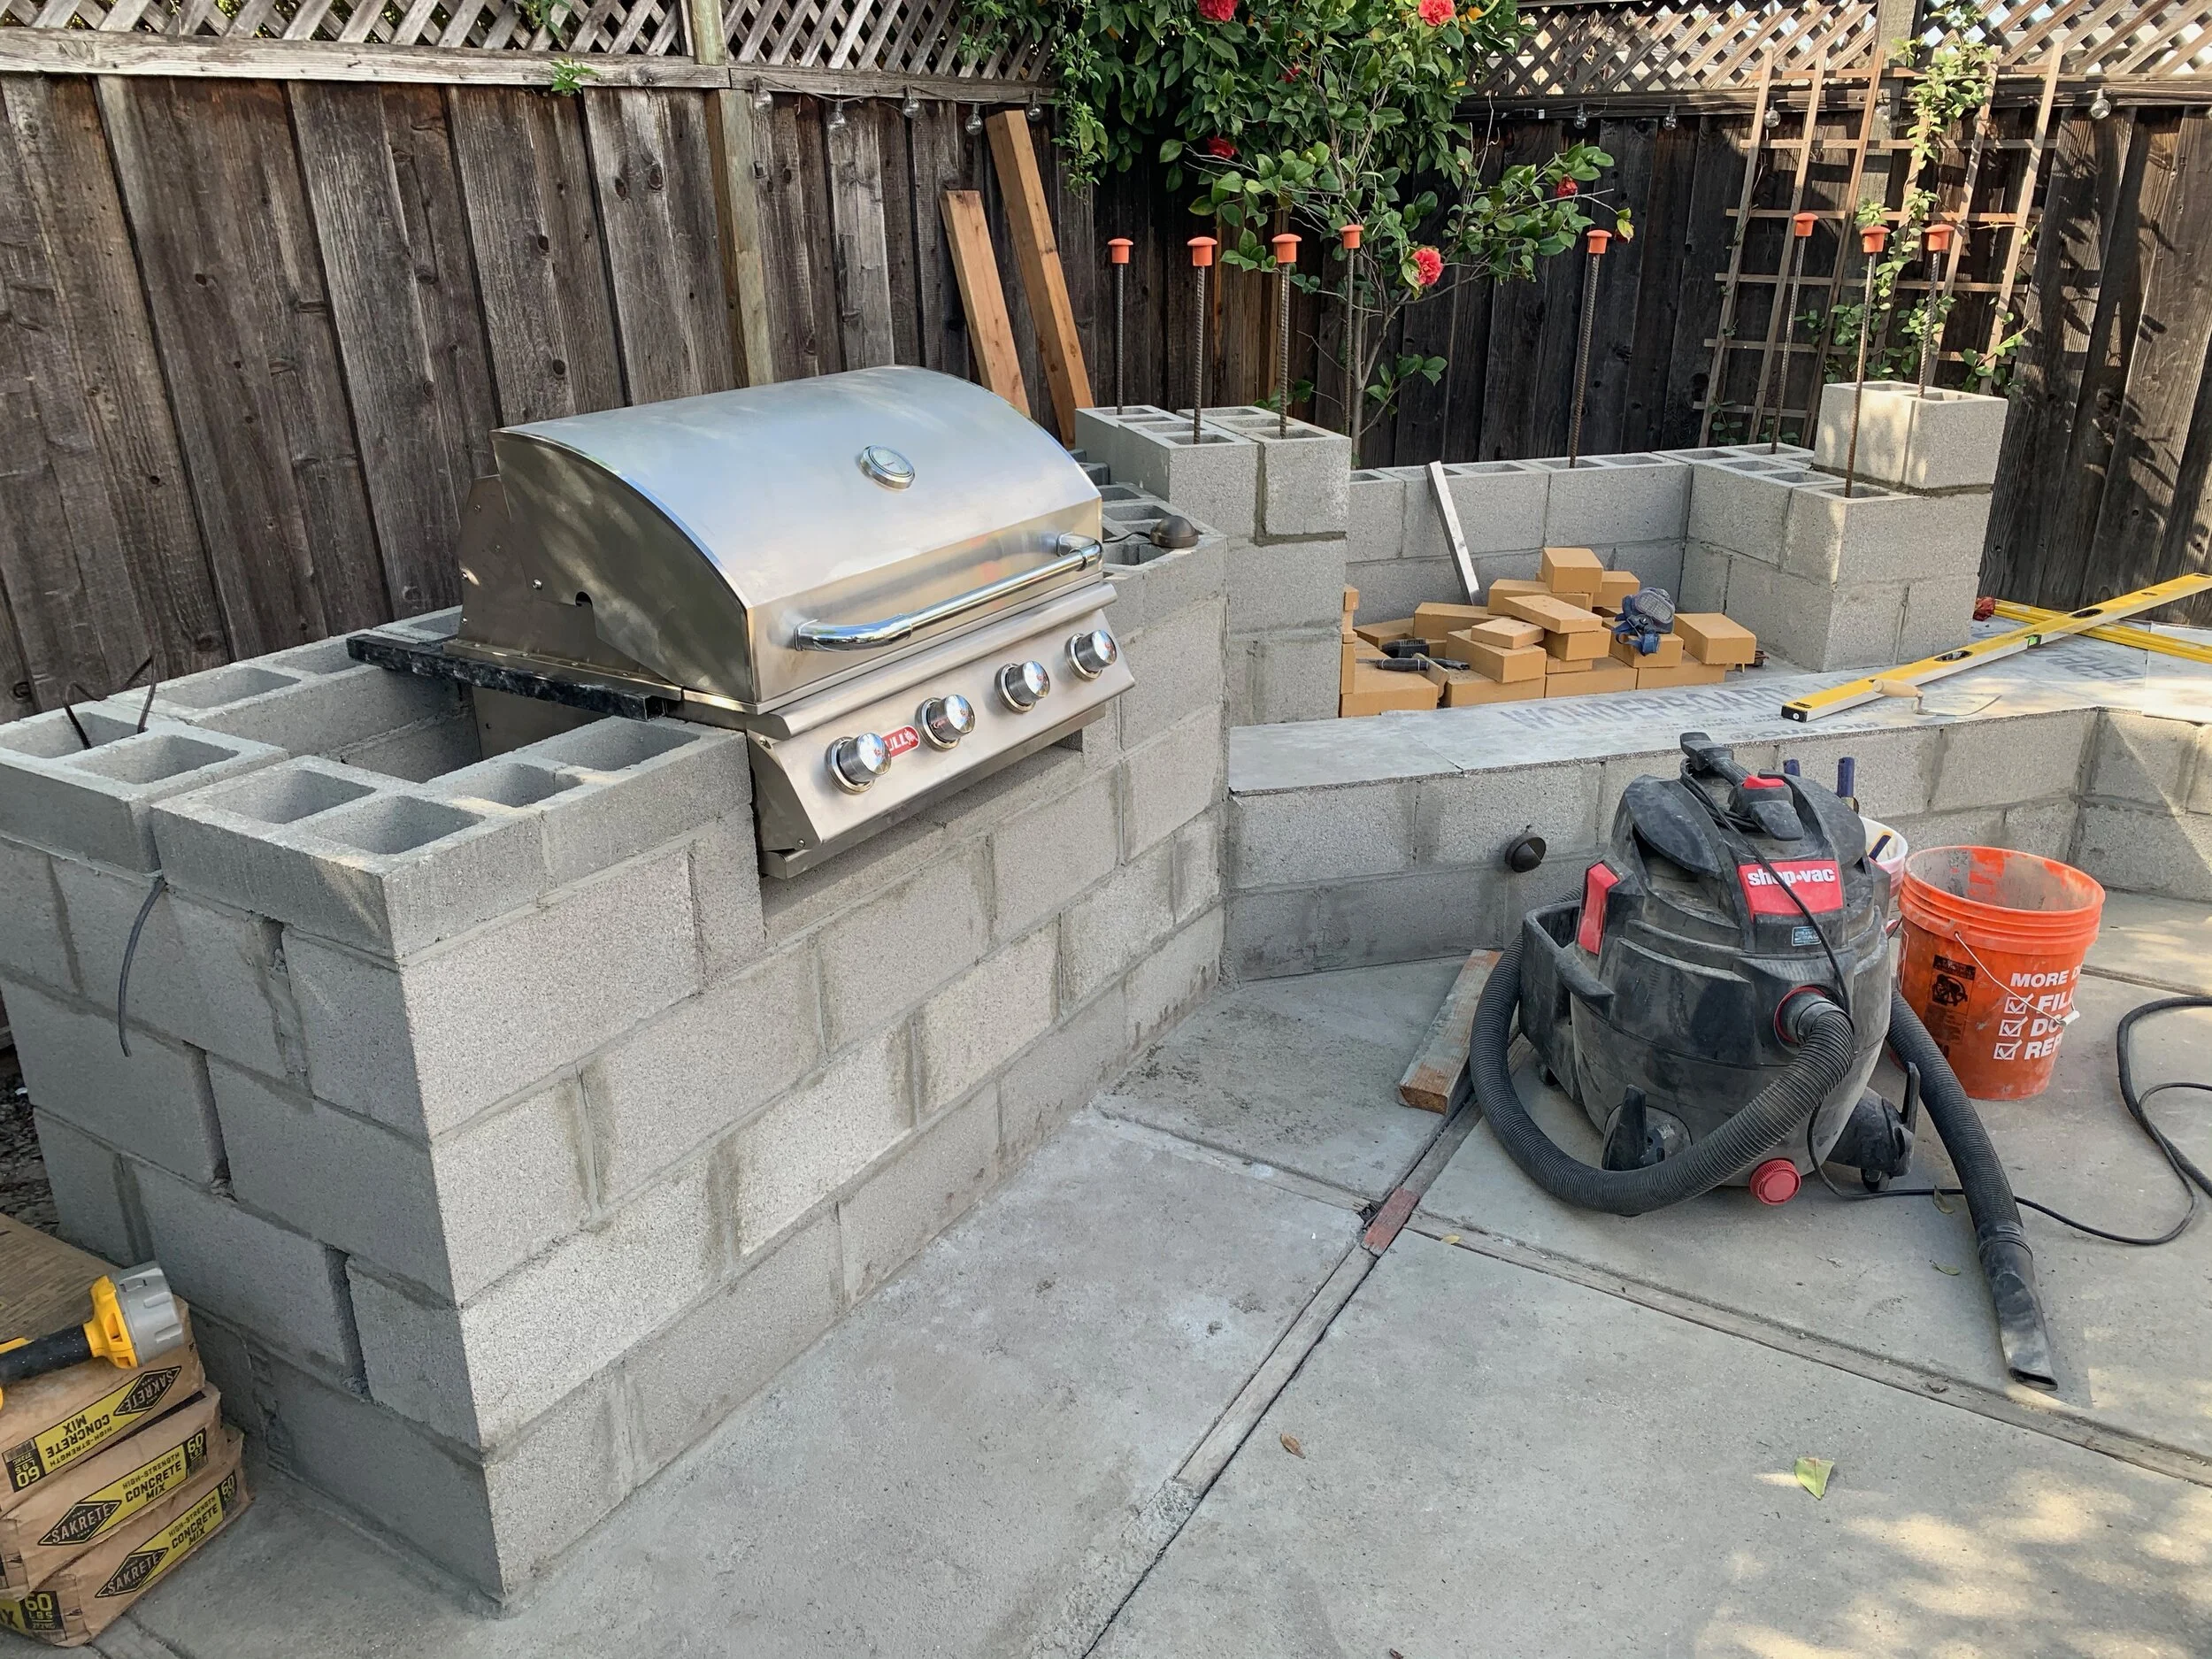
So for a while the project just entailed mortaring and laying running-bond block. After block. After block… and so on. That is, until I got high enough to consider grill placement.
Dan at Backyard Flare had given me very specific instructions for block work after I told him which grill I’d be installing. The manufacturer specifies cut-out dimensions so this thing will drop in correctly, so that much was easy enough. But since I was doing concrete countertops I’d be pouring in place (vs. some kind of stone slab), I just wanted to give it a little more reinforcement instead of just having the (flexible) concrete backer-board beneath.
CUE THE DAVID.
Welding FTW
My brother David was the other outside help I brought in for this project. We know he’s good at building racing drones. Turns out he’s quite the welder too.
So we bought a couple of stainless steel square tubes from Home Depot and followed the grill cut-out specs to make this H-shaped bracket that would sit flush with the top of the blocks and under the concrete backer board resting atop. Then I’d create a frame to pour concrete in place on top of that.
Pics below should be fairly self explanatory. I’m honestly not sure if this part was absolutely necessary, but it made the whole countertop feel MUCH more secure when i was fitting the grill. So, time well spent for peace of mind, mmmmmk? I did end up cutting channels in the block so that the bracket fit flush in there, which you can see in the last pic.
Good on ya, David.


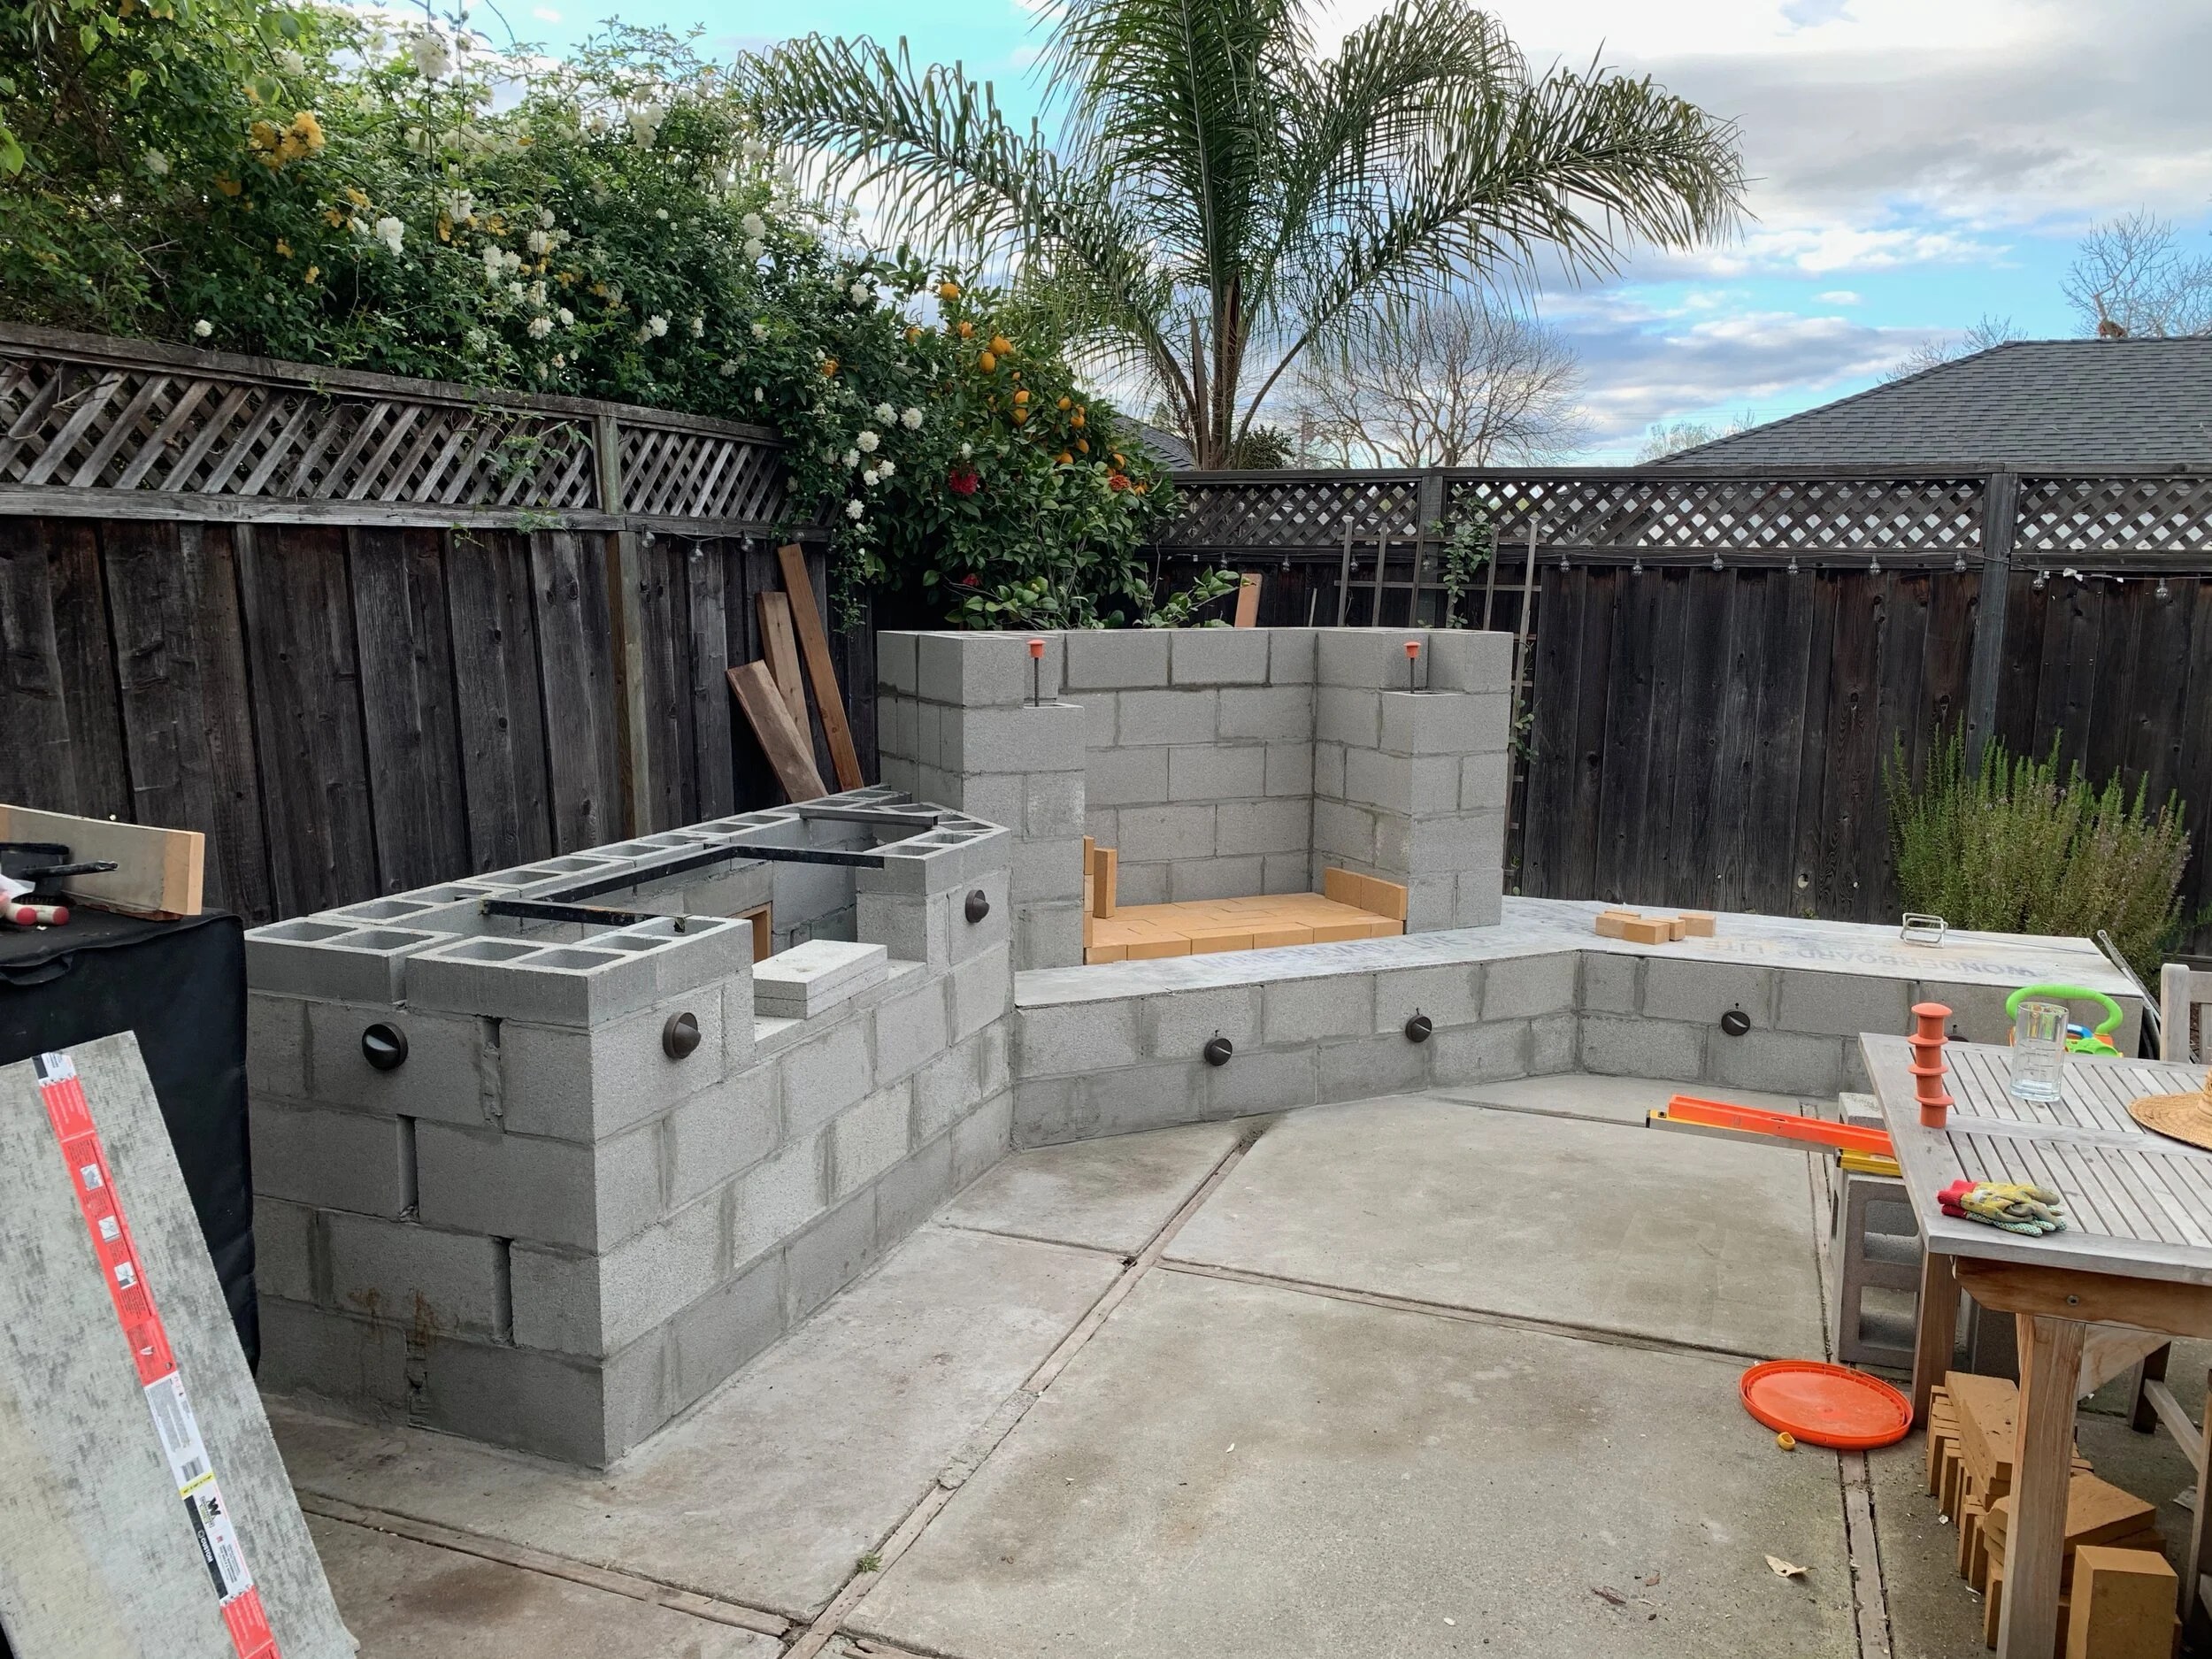
Lintel time
This is the top of the fireplace opening (aka ‘firebox’ in mason-boi parlance) that supports everything above it. It’s a solid piece of thicc concrete with rebar running through it. The concrete actually runs contiguously from the other two voids on either side, so it ends up like an upside-down horseshoe if you pulled it out.
This required building a frame out of big ol’ pieces of wood and spanning across the structure in a level way so it didn’t look tilted when done. I screwed the framing pieces together but ultimately used a pipe clamp to to keep it in place during the pour. I did this because it made for really easy small adjustments to level it all out by tapping the frame with a rubber mallet.
So, I mixed concrete in a nearby wheelbarrow bag by bag and poured it directly in, stopping halfway to embed a piece of rebar, and continued pouring til it was full.
All the videos I watched suggested vibrating the frame via hitting it with a mallet to get all the air pockets out of it. Well I did that, but still ended up with voids. Not sure if it was the type of concrete with aggregate (normal Sakrete high-strength), wood, or I didn’t hit it hard enough or what... It didn’t really matter for this part since it ultimately wouldn’t be seen but I do wonder how to make that surface look super smooth when done.
Anyways, at least it was level.


Electrical!

I debated whether I wanted to spend the extra effort getting a transformer and running low-voltage lines through the structure to add lighting. But HOLY SMOKES AM I GLAD I DID. For anyone on the fence about this, please. For the love of all that is holy, just do it. It really isn’t hard and it makes the structure look 10x better at night.
You can see in the pics all I did was use my rotary hammer drill to create holes where needed to feed the wire, and then my diamond-tipped masonry blade for little channels in the block just under the surface where the wire would run. I used these little outdoor-rated push connectors to tap off the main line and into the lights. Super easy, yo.
Countertops!
I was eager to get these done so the structure could start looking more “finished.” And so I’d have a nice surface to stand on and do block work higher up. Once I was happy with the underlying block structure beneath where the countertops would be, I framed out a countertop with an overhang.
I struggled with this in my mind for a while, but I ultimately just used a bunch of 2x4s. I used the rotary hammer drill to make small pilot holes in the block where I’d fasten one 2x4. Then I used wood screws to fasten other piece offset just a bit above. This would create the little channel/ravine/whatever for the overhang. It’s kind of hard to explain, so just LOOK AT THE PICTURES. And the time-lapse video!
I’m of course no concrete expert, but I did learn a few things:
Wear gloves and a respirator. This is nasty stuff. Seriously.
Moosh the concrete into the sides first, so you can do your best to kill any air voids before they form
Fill the frame higher than you think you need, then use the 2x4 or 2x6 for screeding to help level it out. Use the leftover stuff to mash into the air pockets
Let the concrete set up for a bit first - maybe 30 minutes to an hour - before going over it with a magnesium float. It’ll let it get to a consistency that’s still workable, but much firmer so it actually STAYS in the flat shape you’re after
Take a break after floating to let it settle a bit more. Another 30 min to an hour or so.
I had best results when I could really press down with the finishing trowel without pressing into the concrete super much. At that point, I was really just moving pretty firm concrete around subtly to smooth out the top and give it that nice finished look.
I’m definitely happy with how mine came out, using this “crack resistant” stuff with fiber reinforcement. There are of course imperfections, and I’m not ready to quit my day job or try this inside in our kitchen. But all in all, good stuff.
After it cured for about a week, I went over it with a concrete stain I got from Home Depot in a custom color. Then 24 hours later, I went over it with a low-lustre sealer just for some added durability.
If i were to do it all over again, I would have used a thicker piece of wood for the bottom of the frame to give it a longer overhang. The stones I eventually chose were as thicc or a little thiccer than the overhang, which CAN look non-ideal. But I didn’t think it was too bad in the end.


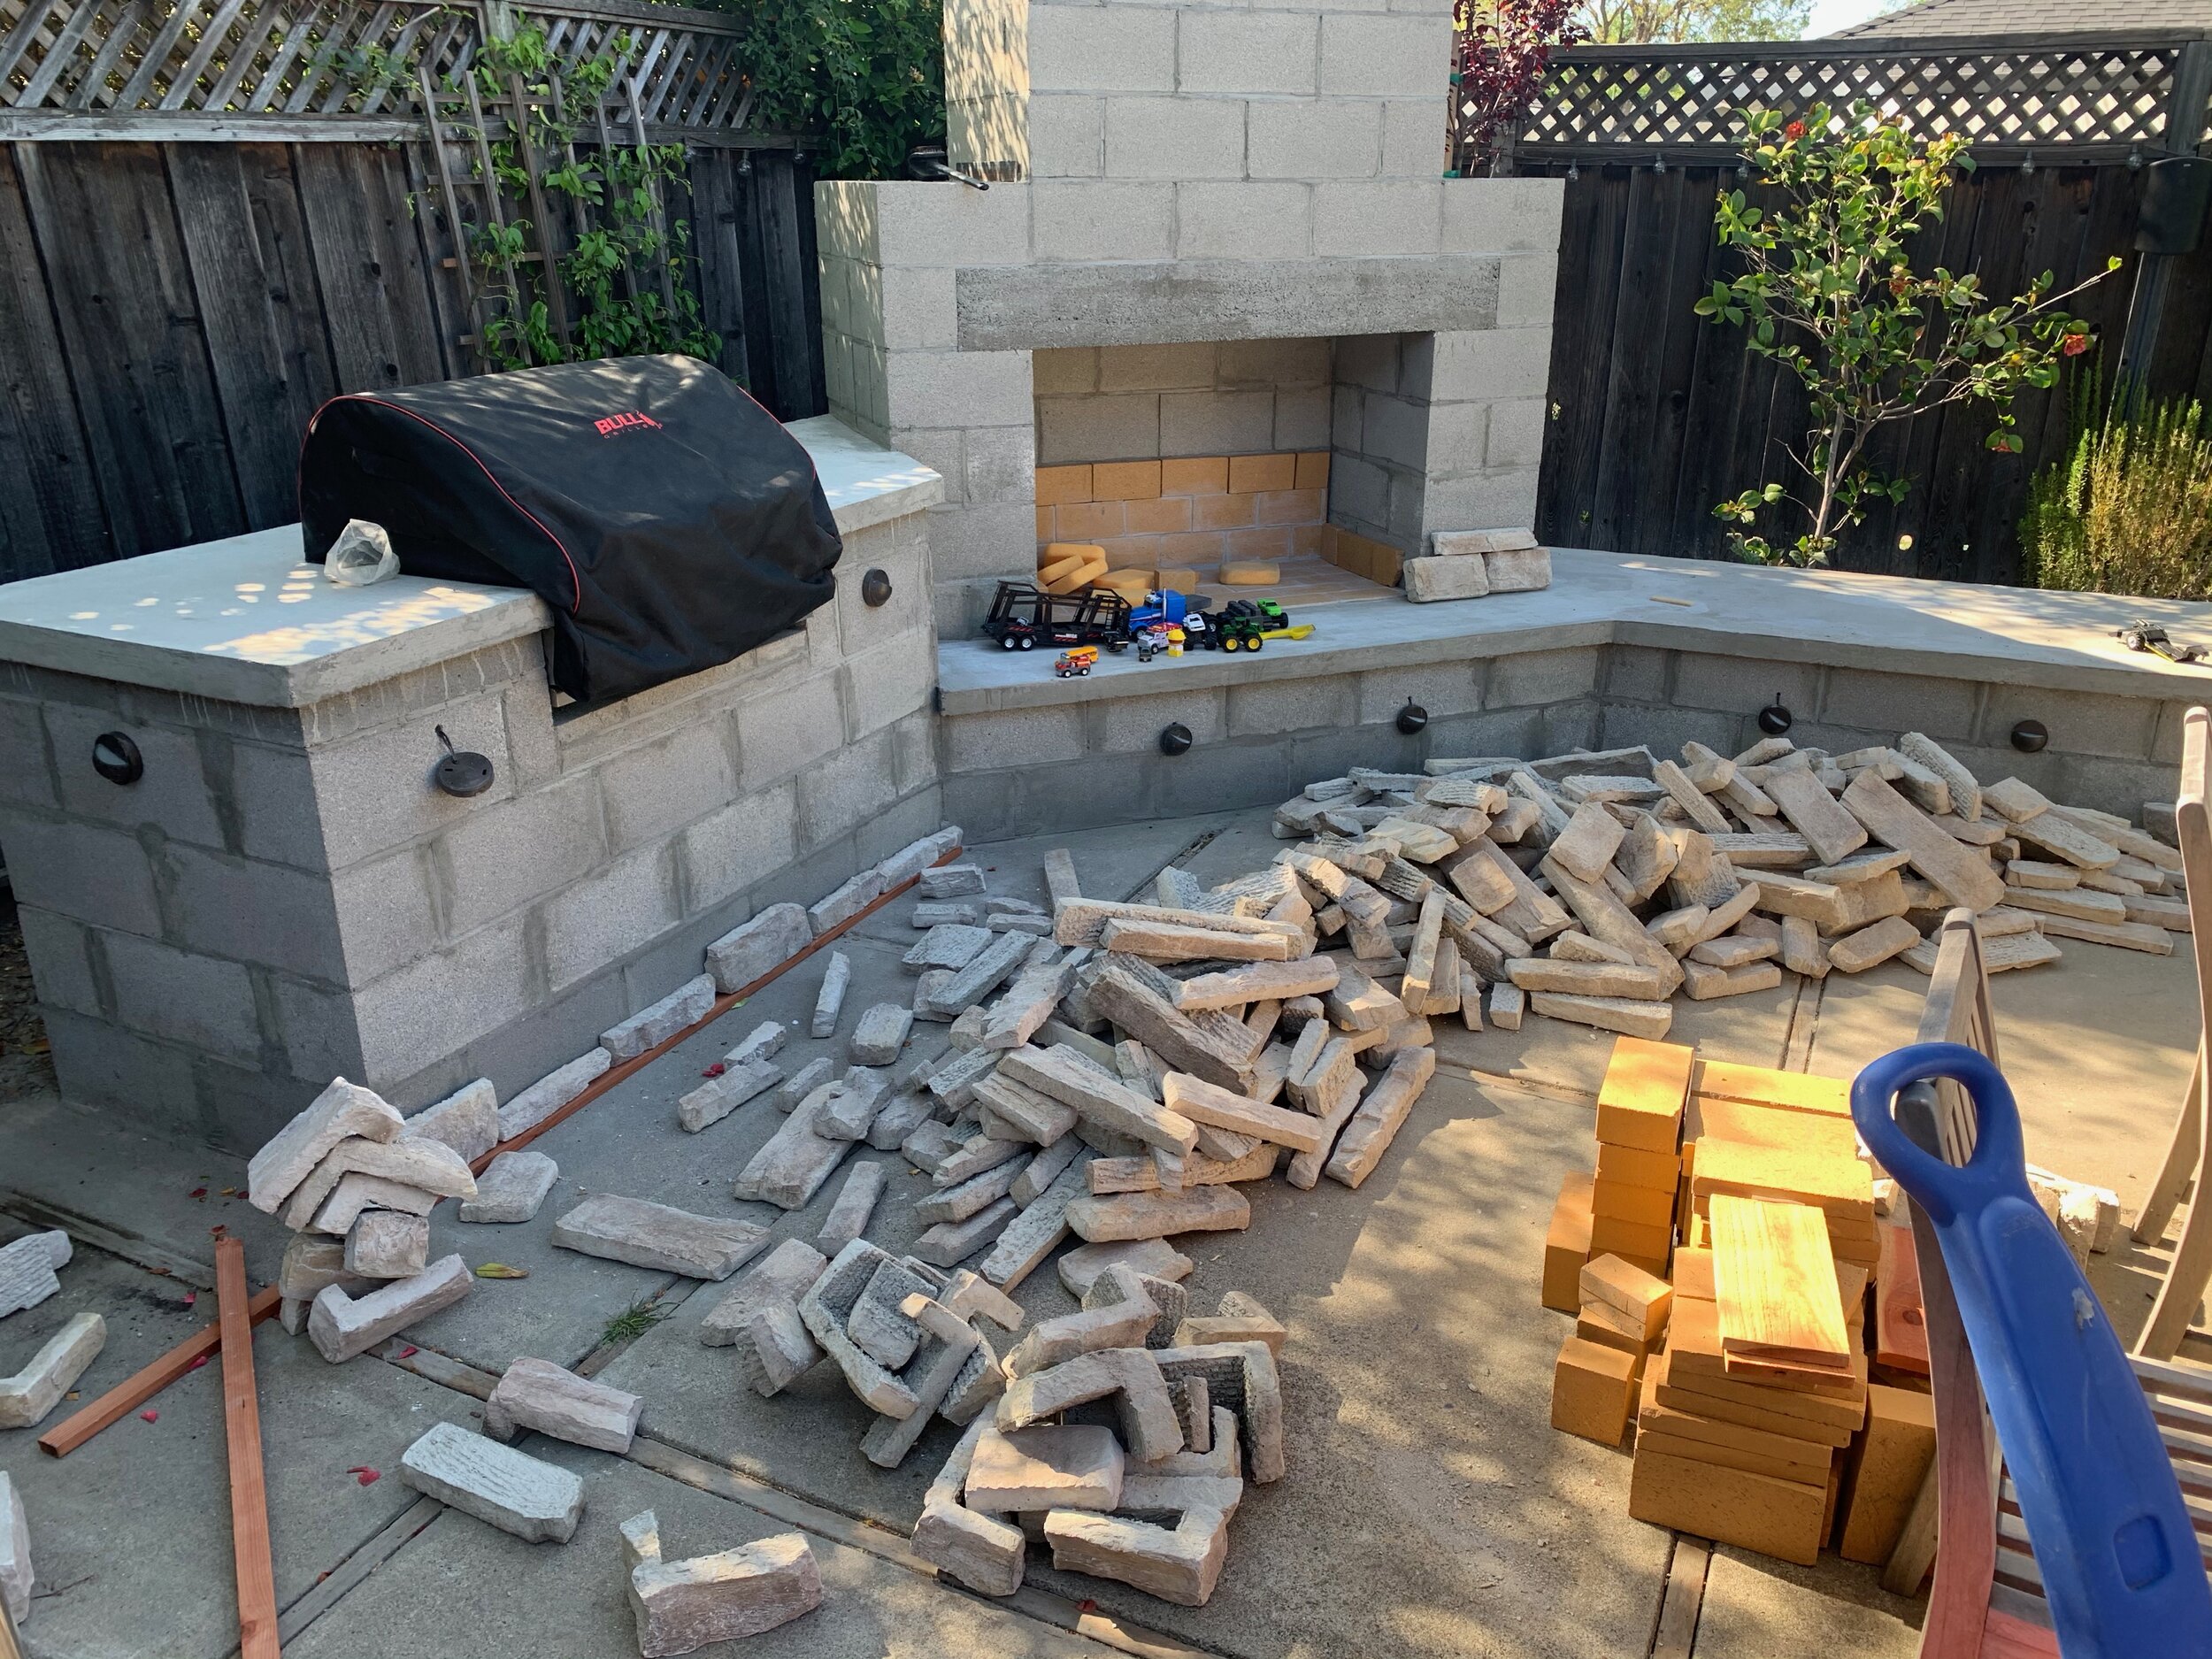
Firebrick!
Cinder block can crack under high heat (and I guess some have even reported it exploding??). Well, news flash: a fireplace is hot. So, you need to line the inside of your fireplace with special brick and special mortar called refractory mortar. I used this stuff. Three buckets of it. And I liked it!

Googling ‘firebrick for sale’ was for some reason REALLY difficult. Seemed like all i could find were 6-packs at Home Depot for $35 or WalMart. Economically, this would not scale for how many I needed. “WTF,” I said to myself. Sorry, but I’m not buying building supplies from WalMart.
Well, Dan to the rescue again. He called around various supply yards near me and found a place that was selling them for $1.50. THAT’LL DO, DAN. THAT’LL DO.
Process was pretty straightforward after cutting for the ones that went around the gas stub-out. I went with a very simple running bond pattern, so all I had to really do was keep em level and alternate the joints, and occasionally cutting on the end pieces to fit. I used the thicc briccs on the bottom (mainly to bring it up to roughly the same height as the hearth) and thinner ones on the sides. I used this stuff called Fuze It to adhere the brick to the block face, and then the Heat Stop II refractory mortar for the joints. Technically Fuze-It isn’t really rated for high heat, but I figure it’s behind a fire brick… and I haven’t had any issues with mine. Dan said he’s had his going strong for 10 years with no issues. Good enough for me!
I would rate my mortaring a solid 7/10 for the firebrick. For some reason I couldn’t keep it clean and off the faces of the brick, so it did end up a little messy in the end, but not a deal-breaker.

Rough build done at this point — just working on the firebrick inside the firebox.
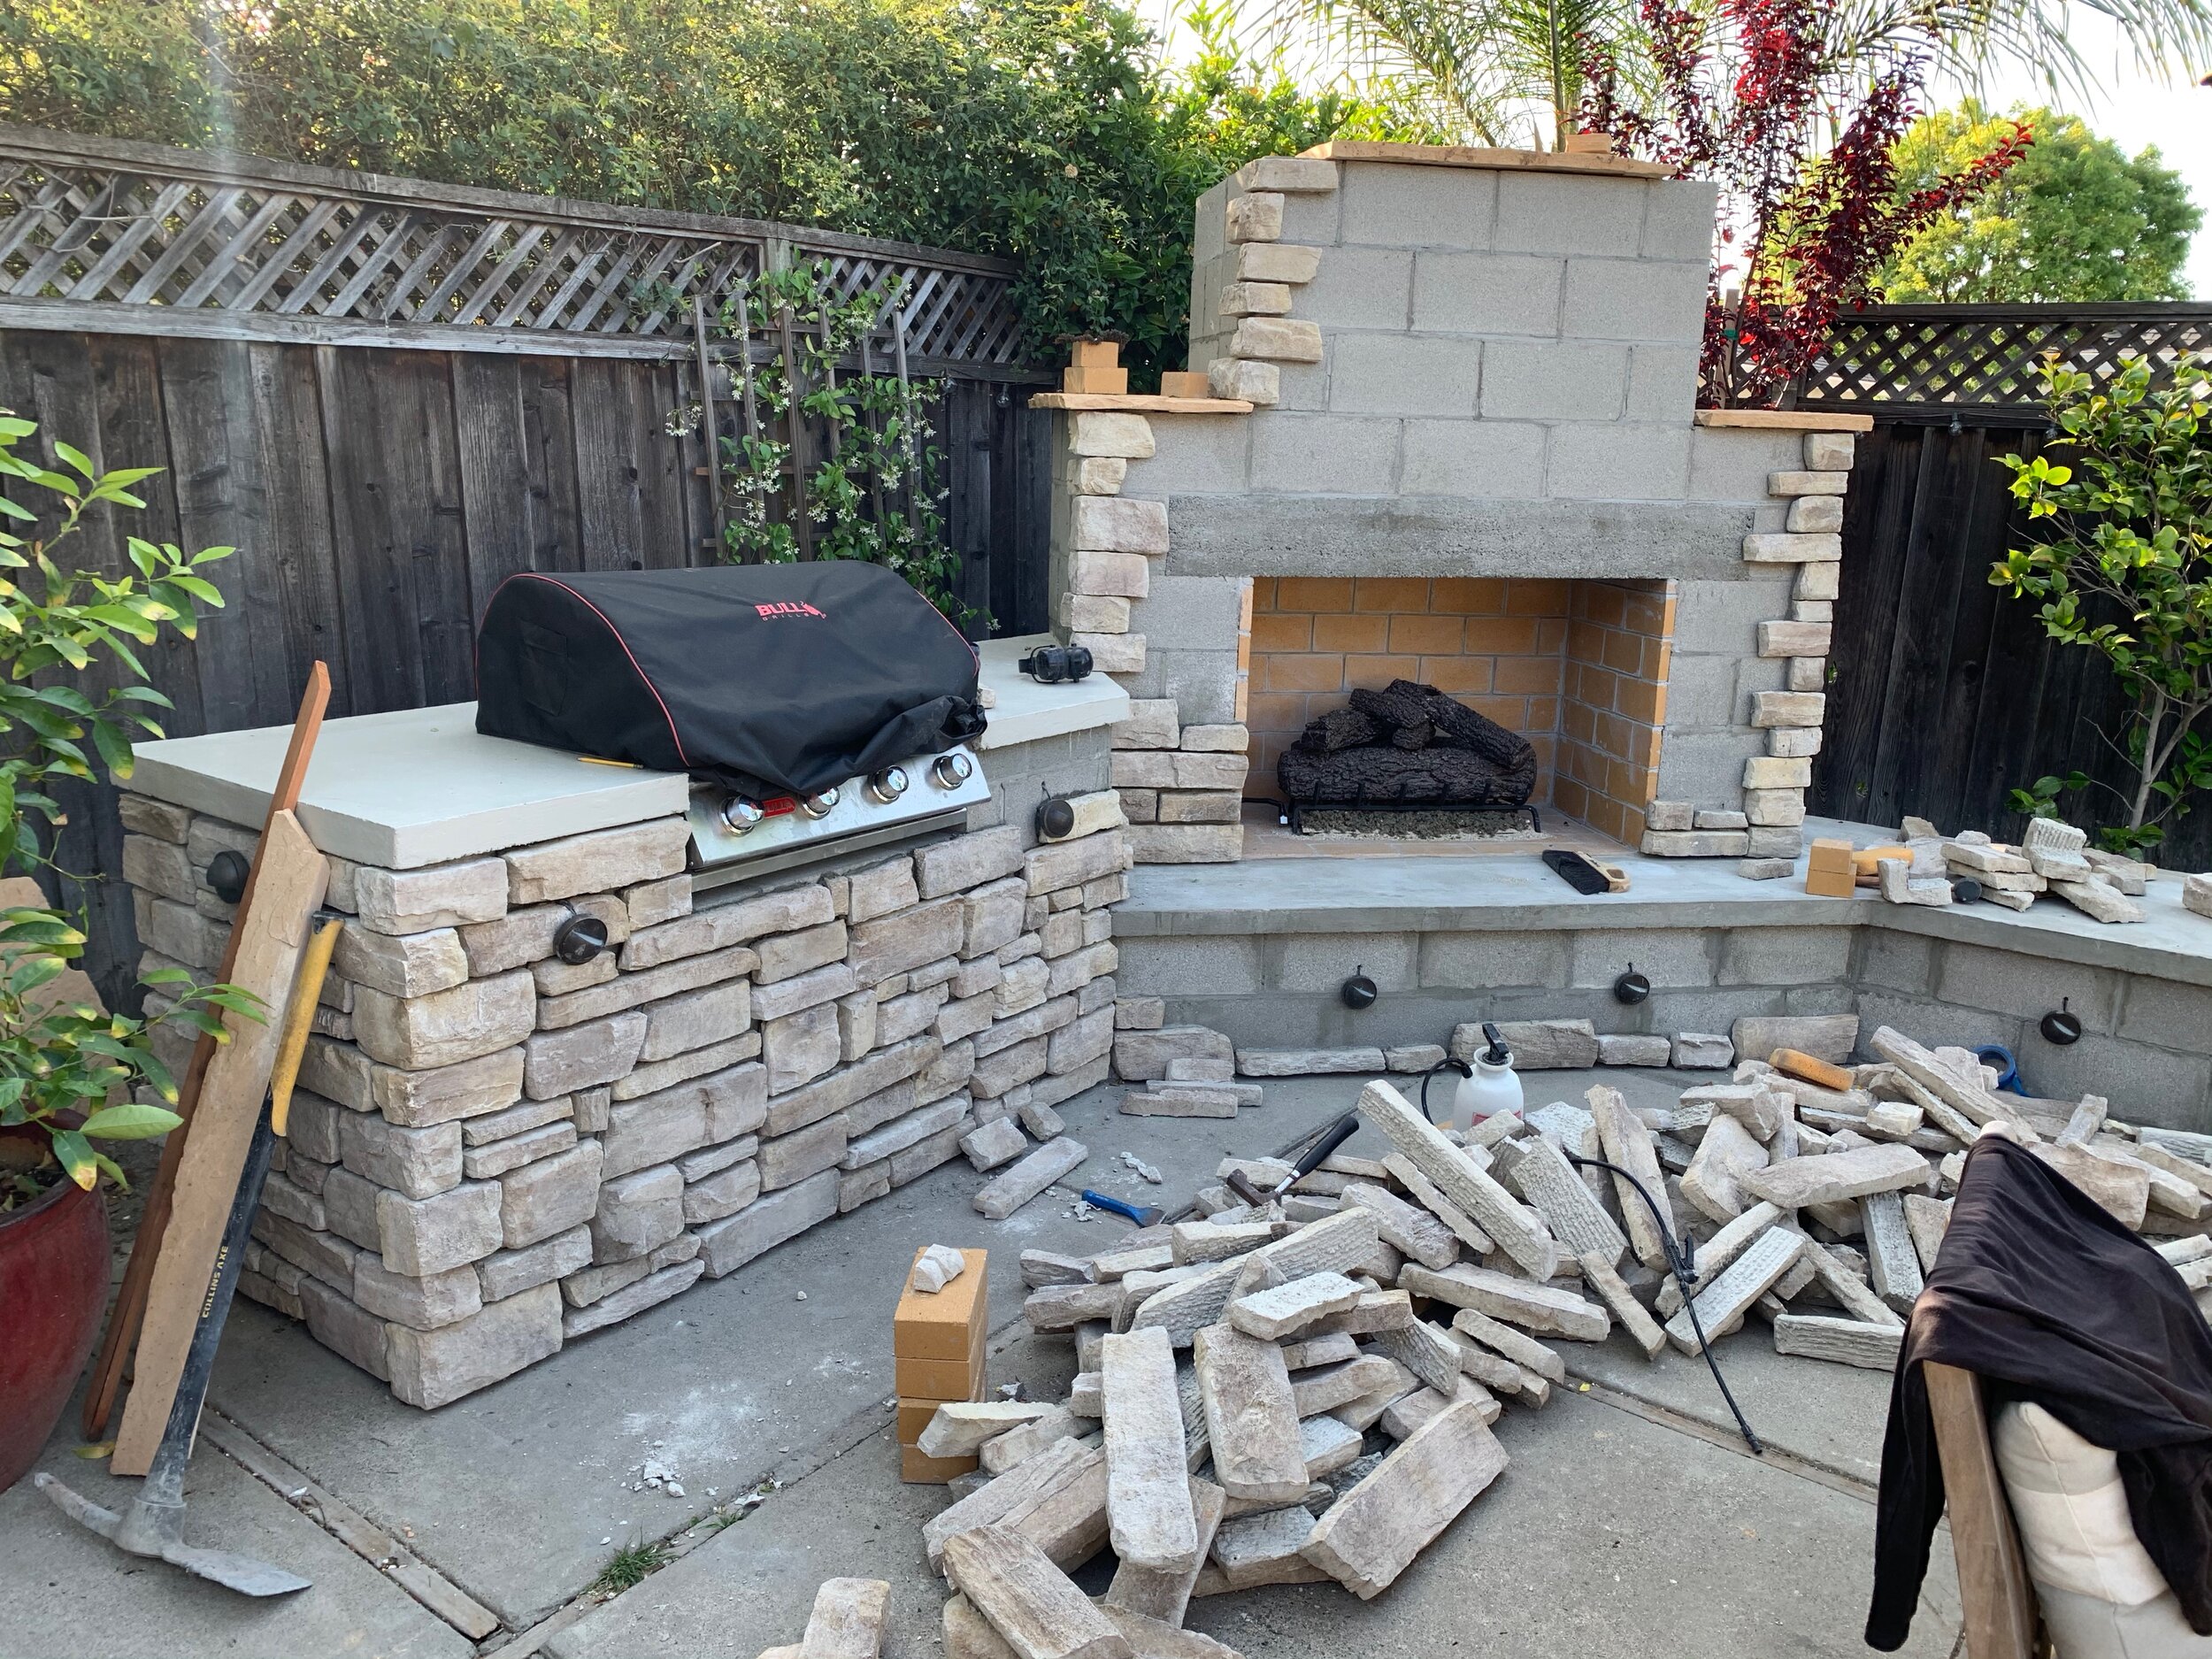
Let’s get stoned
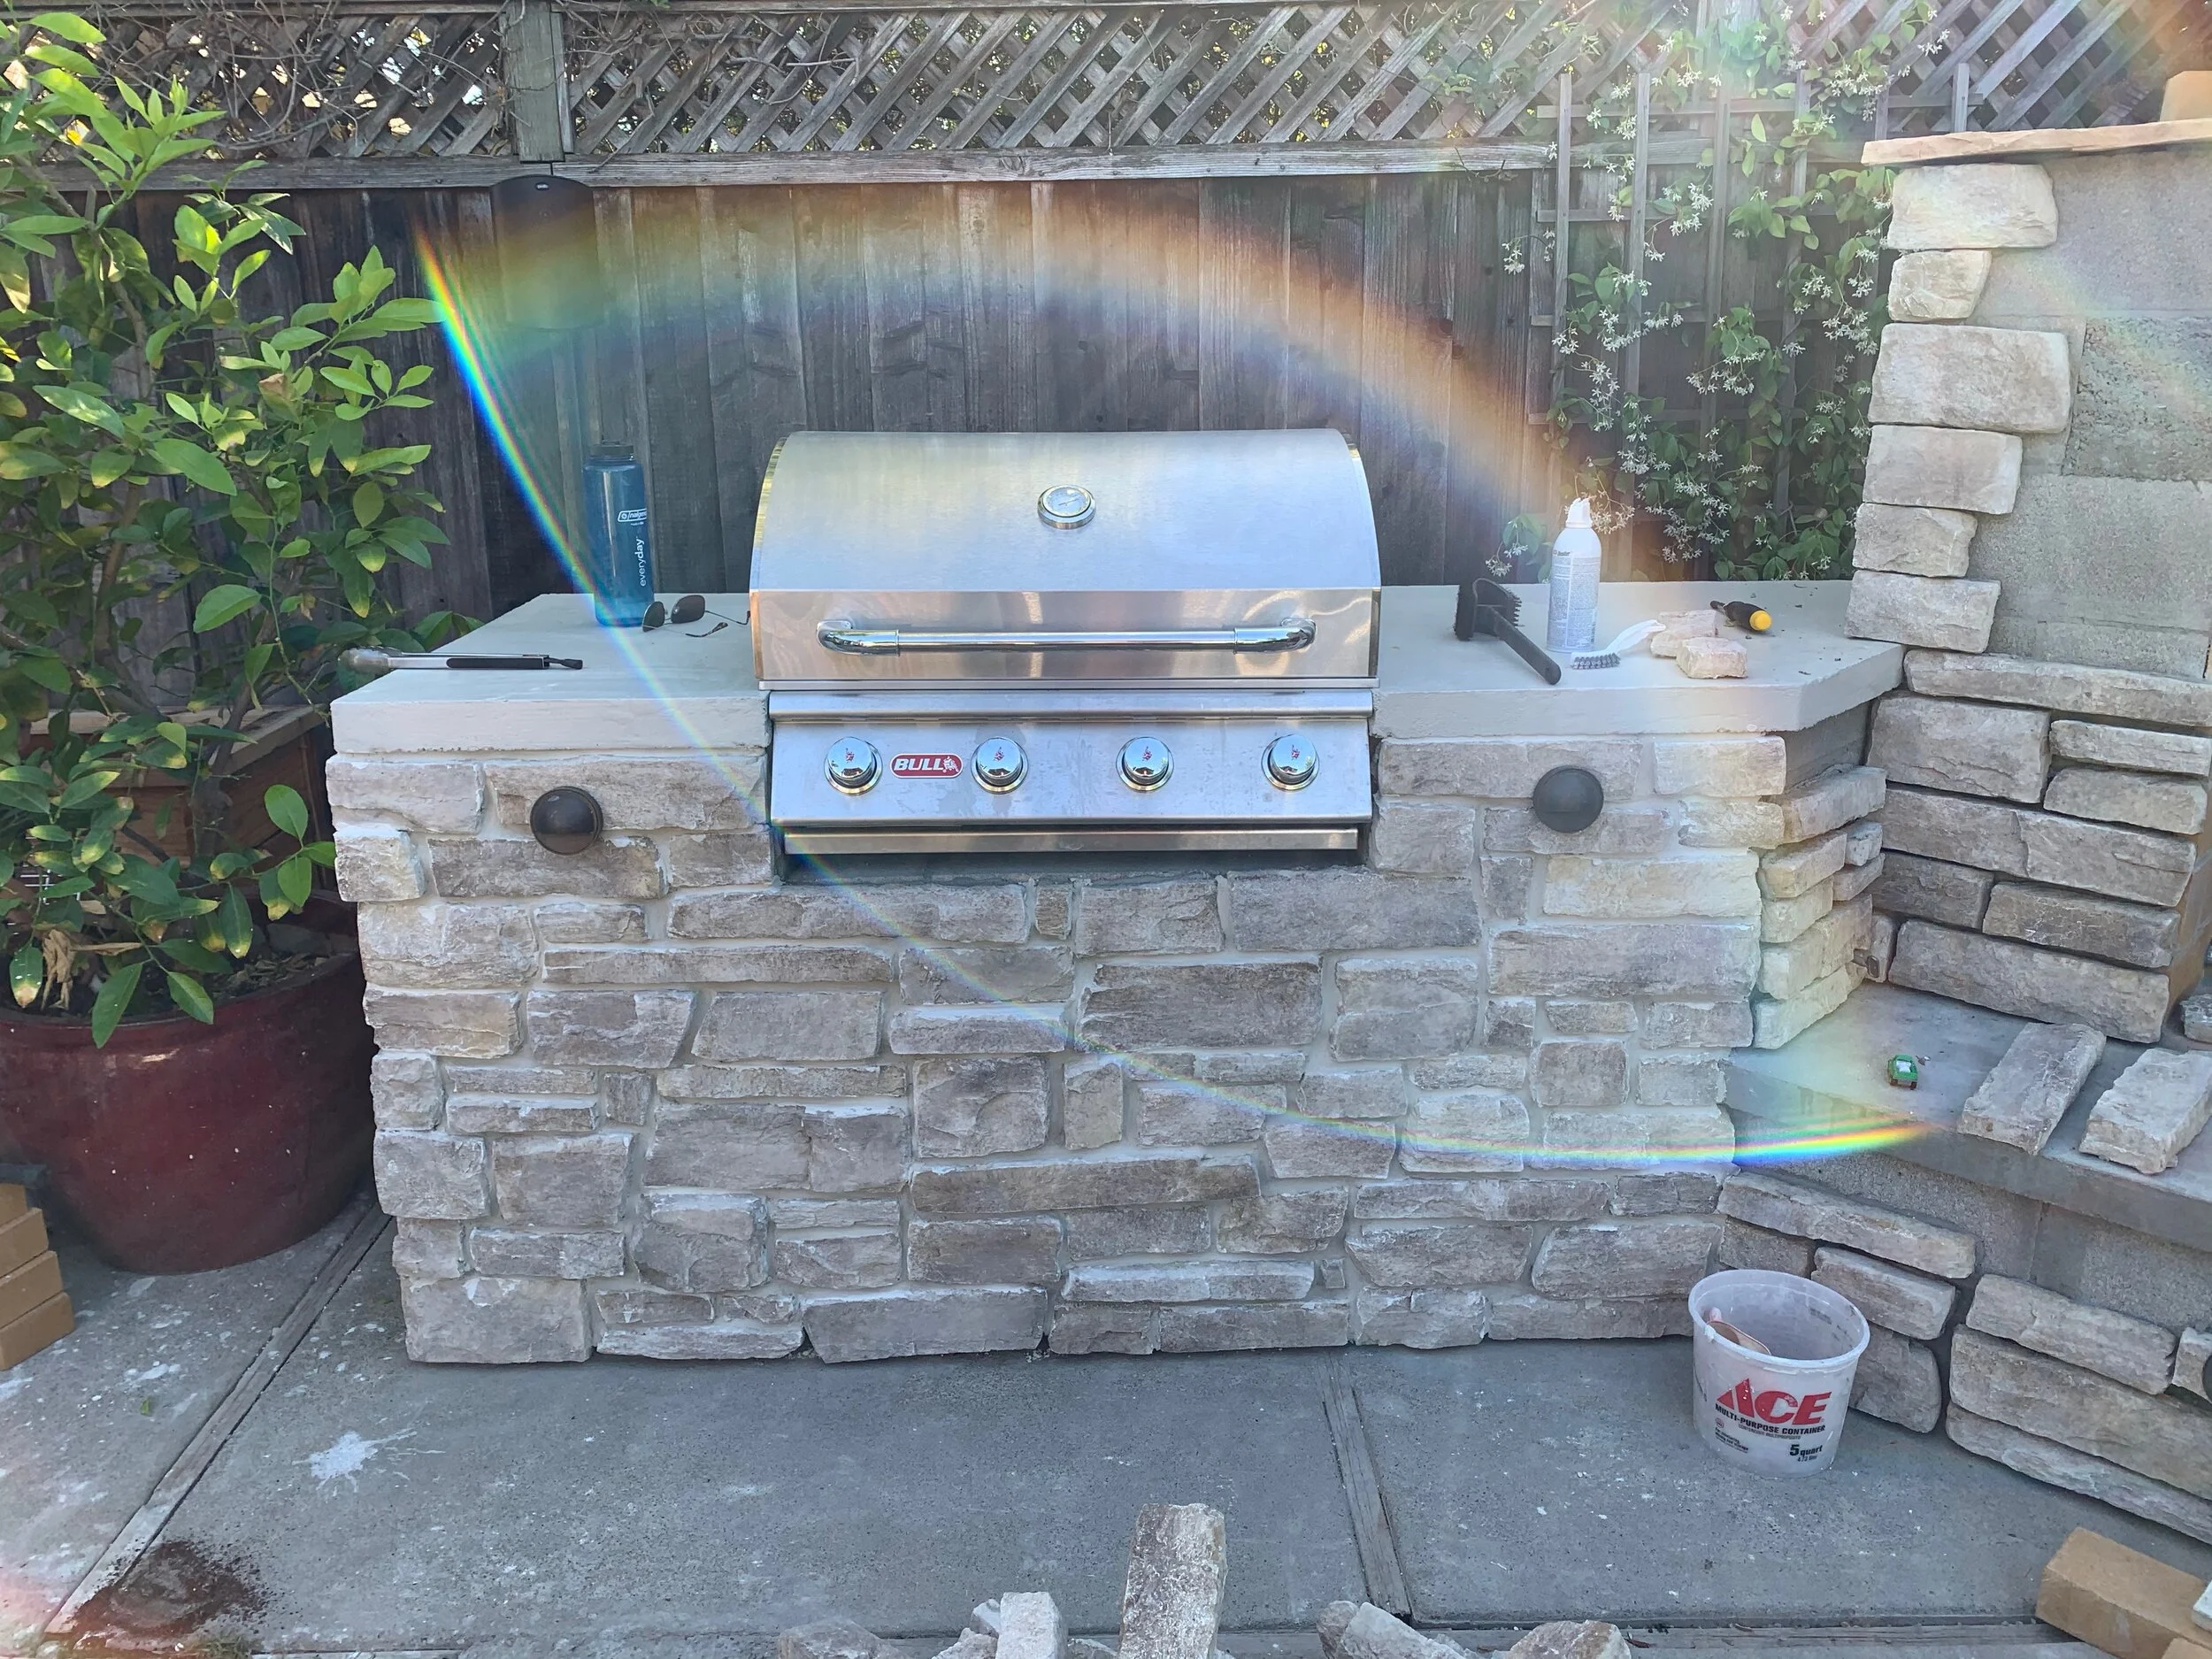
Oh boy. This is the good stuff. This is what really brings the whole thing to life.
And it’s freaking hard.
First, since I didn’t really know exactly what I wanted, I went to the fantastic showroom at Peninsula Building Materials (PBM) at my dear sweet mother’s recommendation to gather some inspiration. I knew i wanted some kind of stone look and I knew I didn’t want to use the typical thin stacked-stone veneer look that you see all over the place. To me that feels a bit fake. I’m no geologist, but I don’t think you’re seeing that pattern in nature too often.
Well, PBM made me feel a lot like I did when i was 12 going into a Toys R’ Us. They let me take a sample home of a manufactured stone I liked the look of and it seemed to match our house color OK. Price per ft. was manageable. For anyone curious, here’s what I landed on. It looks super real to me, even though it’s manufactured. Couple days later, my brother and I went over to their stone yard nearby and loaded up our cars with this stuff. YAY.

Getting stoned with David
And then this what my back patio looked like after unloading. What have I done.
Good god.
While laying block was like playing with Lego, this process amounted to a gigantic game of Tetris. It’s a good thing we were all sheltering in place, so time I’d previously spent commuting went to stoning.
I read differing opinions on whether a scratch coat (ie, smothering the block face with mortar and then raking it to create grooves when it hardened fully) was necessary. I did both. The first 60 percent of it was done just buttering the back of the stone and pressing it into the flat concrete block. There was definitely a learning curve as I went — I eventually picked up a tip online that you put mortar on the back of a stone in a circular pattern, leaving a hole in the center so when you press the stone into the block, that shape creates somewhat of a suction cup and it helps it adhere to the wall without needing to brace it with something.
I still found myself using long sticks and other stone pieces to brace the ones I’d put up. Made ME feel more secure moving onto the next stone.
The thing with vertical masonry like this is… make sure you REALLY clean the surface you’re sticking stones to. Over the course of your build, these cement blocks will gather dust. They just do. And even a little bit of that stuff can kill a good bond between mortared stone and block. Several times in the beginning of this phase, I’d stick a stone on, then come back a few days later, wiggle it a bit to check and it’d pop right off! A professional mason might attribute that to something else, but I believe it was because there was still some dust on the surface. So, hose it down before you stick ‘em on. You’ll thank yourself.
Anyways, slowly but surely my Tetris pieces fit and I just… kept going. Occasionally I’d get out the angle grinder with diamond blade on it to cut a stone to fit, but I tried to do that as little as possible.
Oh, and this vertical masonry is really where I felt the Greencore Type-S stuff worked super well for me. I can’t fully explain it, but it just squished nicer than the Sakrete stuff and seemed like it gripped the block surface better.


As I said, I did eventually do a scratch coat on a few of the faces just to see the difference, which you can see in the album above. It did seem to provide a little more physical/mechanical grip for the stone to grab onto. If I did it all over again, I’d probably opt for full scratch coat. I guess I was getting impatient to be done with this thing!
The other thing to note here is that the lights I chose dictated that I wire it all together through the holes before i put the stone on. So, I just had the lights hanging there while during the stoning process. When I got to the section where the wire was sticking out, I just cut little U-shaped channels on the stone where it would be placed around the low voltage wiring, and then just made sure the mortar didn’t harden around it (so i could still push it back in on final install).
Also, I’d recommend NOT putting your hammer drill on ‘hammer’ setting when you’re making pilot holes for the light fixtures. There’s too much vibration and you risk pieces falling off. Just use a masonry drill but and have it on the regular drill mode. Takes a wee bit longer (not really) but it’s less headache.
Grout!
To me, the grouting is what really finished it off. The stone was awesome, but filling in the gaps just took it to a whole new level for me.
And this was a lot like putting icing on a cake. The grout bag basically IS a cake-icing bag. I don’t know if there is any actual difference between the two.
I used a custom color PolyBlend sanded grout that I ordered from Home Depot and had delivered to my door. Nice.
I will tell you - this is a messy process. Make sure you put down some tarp or something because try as you might, this stuff gets EVERYWHERE. I also would say make sure you mix it in a way that’s workable enough to squeeze out the end tip of the grout bag, but not SO goopy that it can’t support itself in the joints while it sets. For some reason this process was incredibly exhausting for me. I ended up with very sore pecs, wrists and shoulders when I was done. Who needs a home gym?
Try to get the grout alllllllll the way into the back of every joint and then squeeze on top of it from there. Once you fill all the joints, wait a bit for the grout to get thumbprint hard. I then used one of the most advanced and complex tools I’ve ever seen to do the first pass of smoothing out joints: the other side of a sharpie pen!
Seriously, that or something like it is all you need to take a first pass at scraping out the bulbous top layer of grout. After that, I went over it with a $3 grout brush from Amazon to smooth it out even more and get some of the grout crumbs (is that what they’re officially called? They should be.)


Final thoughts
I’d never done a project like this before. Some wood-working, landscaping and light electrical here and there but this was on another level. I’ve always wanted an outdoor fireplace but doing so had always been cost-prohibitive to hire out.
There was absolutely a steep learning curve on this. Seemed like every new phase I entered into, I started back at the beginning of the curve. Block laying, cutting, grouting, mortar-mixing, whatever. Every aspect has its own art to it.

Here are some parting thoughts to consider if you’re going to embark on something like this:
Don’t just start laying block and figure out the design as you go. Make plans. I can’t recommend working with Dan and Backyard Flare enough. Having idiot-proof instructions and an experienced person to bounce questions off proved 100% invaluable.
Always make sure you’re wearing PPE. Concrete and masonry dust can eff up your lungs and slow you down on the build.
Blocks are heavy. Learn proper lifting form, and wear a back brace! You’ll thank me at the end of the day!
Anytime you put in an hour or so, know that this is a full body workout. Stay hydrated.
Work with your mortar in the shade so it doesn’t dry out on you while you’re working. It’s not a good idea to “re-wet” the mortar after it’s started drying out as that’ll lessen it’s bonding abilities.
Concrete and masonry is very permanent. Make sure you think through everything before you start mortaring in stuff as it’ll be difficult (though not impossible) to correct after the fact.
Home Depot was my go-to store for most materials but check online at other places too, even Amazon.
Harbor Freight is another great store to use, especially if you’re getting tools for less frequent use. I got my angle grinder there for like $25 and I had zero issues with it throughout the entire build.
Get heavy material delivered! I thought when I first started that I could manage by multiple trips to Home Depot filling my car with 6 or 7 blocks at a time. Delivery from HD was about $100, so I thought I’d save money doing it my way. But if you have the room on your property somewhere to keep the ~200 blocks, it is REALLY a good idea to have all the material available to you there. It’ll make the process go by MUCH quicker.
Have fun. This will get frustrating at times, but don’t forget you’re building something that’ll add value to your home and completely transform your outdoor experience.